DIY decorative birds. Birds with their own hands: the best ideas with a photo. Peacock from bottles
Today we will make funny birds - flamingos, storks, crows, parrots and yellow chicks. One of the topical topics for creativity in kindergarten or holding a homework competition is a bird craft.
Before starting to create this craft, you can conduct a thematic lesson with children, talk about the life of birds in the summer, about why it is at this time that we most often hear bird voices around us.
In the event that the goal is an interesting handicraft of a bird with your own hands, in a kindergarten or in an early development center for a competition, then to create it you need to use the most beautiful and original materials.
Undoubtedly, real feathers will decorate such a craft. From them, you can lay out the whole image of a bird, based on the color of the feather. For example, white feathers can turn into an adorable stork. Use bulky materials to create the beak and legs, and for a more natural look, place the bird in a nest made of real straw or dry grass.

A very original postcard with a stork will be obtained using voluminous paper elements.

You can use feathers as a decoration for a finished look - create a tuft, wings or tail from them. For example, what kind of parrot can be made from feathers and ice cream sticks.

You can make a birdie out of paper, but place it in a large basket made of two disposable plates.

A wonderful chicken can be made from folded paper or a cardboard roll.

Eggshells dyed with food coloring make adorable chicks. If we put them in halves from an unpainted shell, we get a touching composition "hatched chickens"!

And here is a lovely couple - a cockerel and an eggshell hen.

Another version of chicken and chicken is made of felt.

Such a craft will be a wonderful Easter basket.
 Easter basket "chicken"
 Felt and satin ribbons can be used to make a wonderful souvenir in the shape of a chicken with a flower.

Another adorable in-shell chick can be made using the quilling technique.

Watch the video "how to make a bird in a cage:"
You can add a twist to the applique by moving the bird's paws and head outside the cardboard base. 
If multi-colored wings are available, a fantastic flamingo can be made. Its body will be an old CD-disk, its legs will be made of chenille wire, and the head and neck will be made of felt or velvet cardboard.

Feathers can be dispensed with.
A beautiful voluminous stork will turn out from cotton wool and thick yarn for knitting.

Or from round, folded in half, white and black paper blanks. The applique made from such modules looks very strict and impressive.

Instead of paper, it is convenient to use disposable plates to create semicircular modules. In this case, one plate becomes the body of one bird.

And this is a funny applique "flying birds with a feather".

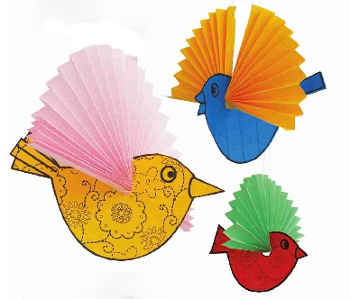
Very spectacular bright birds are obtained from plain paper. Thin sticks are glued to two opposite sides of the paper circle. The circle folds in half - the sticks are joined together to form the legs of the bird. They can be fixed with plasticine - then the bird will stand. The beak, wings, tail and scallop are made from brightly colored strips of paper.

A variety of birds can be made from natural materials. For example, an apple cockerel can become a real table decoration.

A smart penguin with glasses can be made from eggplant and carrots.

The penguin can be made using paper and cotton wool applique technique.
 Application "penguin" made of paper and cotton wool
 A stunning penguin figurine can be made from a painted shell walnut.

A fun turkey can be made from maple leaves.

And the wings of many prints different color useful to a chic bright parrot.

You can vice versa - draw the body of the bird, and make the wings from a different material. For example, a disposable plate.

From cardboard and paper folded like an accordion, a spectacular lark is obtained.

In the same technique, you can make a variety of colored birds. Watch the video on how to do it:
A paper lark can be made in the same way using the popular origami technique:
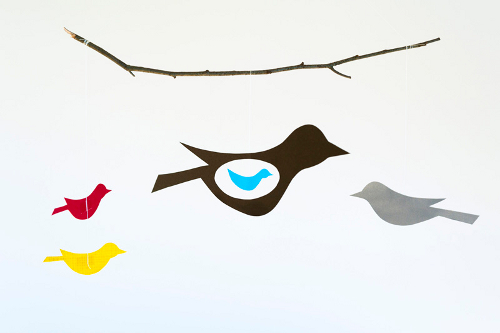
You can decorate the finished applique with strokes of paint, which will look much more interesting if you use wood glued from wood-colored decorative film and colored paper as the main background.

The "bird in the nest" application can turn out to be very touching and springy. The applique looks interesting, in which a combination of materials will be used. For example, to make this applique, we used paper, napkins and plasticine.
 Application "birds build a nest"
 Using various materials for creativity, you can make a volumetric applique with birds and insects.

Check out how to make a beautiful spring applique with birds and birches:
Very interesting birds can be made using the facing technique. The basis of the craft is smeared plasticine. Insert pieces of paper into it with a small stick or toothpick. We made a graceful swan using the trimming technique.

But such a charming swan can be made from a bump, cd disk and plasticine.

Cones can be used to make extremely charming owls.
To decorate a children's room, or a garden, homemade products are used for setting a festive table. Birds made from plastic bottles or wood are used as decoration. Another manufacturing method is from rubber bands. It is worth considering each option, choosing the most optimal one for yourself.
Birds from bottles
Lawns are often decorated with homemade products. As you can see in the photo, the birds with their own hands complement the style composition, emphasize the advantages of the place.

Manufacturing does not take much time, all family members can be engaged in it. Turn this process into a holiday, during a collective creation. Thus, you can spend time with your family, have fun with your children.

In order to make a peacock with a painted tail, you will need five-liter eggplants and many plastic bottles of 1.5-2 liters. Prepare trash bags, scotch tape, foil. You will need scissors and a stapler as tools. Use a brush and acrylic paints to decorate a decorative item. The varnish is used as a fixer.


After preparing all the materials and devices, you can start the main work. First of all, plastic containers should be processed. From the inside, it must be clean, without a trace of glue or liquid. In the worst case, you will get dirty and slow down your work.

One of the most difficult components is the bird's tail. The middle part of the bottle is cut into three long tongues. The bottom and neck of the bottle must be cut off beforehand.

Round one end to a feather, make very small cuts around the edges. A blue oval is attached to the rounded ends, for this you need plastic bags, a circle of foil. Using a stapler, you need to fasten these elements of the product.

Note! In order for the bird's tail to be voluminous, fluffy, many such homemade blanks should be prepared.

The last step is painting the bird and securing it with varnish.

Bird for the garden
In order to find out how to make a bird with your own hands, you should use the following recommendations.

Prepare a five liter eggplant. The neck should be cut off, the bottom is also not required. Next, cut out a semicircle from the middle section. After that, feathers will be attached to it with a stapler.

Then they start making the base - the body of the product. Cut a neck from 5 liters and 2 liters, fasten these two elements with a wide tape.

The bird's head is made as follows:
- cut the neck, twist to create a beak;
- connect it with a cut off large neck. To do this, use scotch tape;
- fasten the part to the base.

The advantage of such products is their long service life. Plastic material, like polyethylene, does not deteriorate due to bad weather, in particular, it concerns snow and rain.

Cut strips from garbage bags, then attach in rows to the body of the bird. Move gradually from the top to the bottom of the bird's body.

You can fasten the base and tail of the peacock with a rope. Before this, a hole should be made in the place where the mount will pass.

For fixing directly on the lawn or in the garden, a stick should be attached to the bottom. Use acrylic paints to paint eyes, beak, and other elements as you wish. Then fix the result of coloring with paints.

Note! For additional decoration, use a crown made of foil. A little sand should be poured inside so that it is heavy, it does not blow off the bird's head.
Bird for children
Product for kindergarten easier to make than a large bird. If you can, you can complicate the process with a wire mesh frame. This will be the base, along with the foam, from which the bird will turn out.


With the help of acrylic paints, the product is painted, varnished. Car tires are often used to make a product.

Manufacturing techniques
There are many manufacturing techniques and materials. The French weaving technique is often used. For this it is worth choosing the right fittings. Real creations are made from wires.

The kanzashi technique is considered to be quite common among needlewomen. In addition to hairpins, flowers made using this technique, you can make other crafts.

For the manufacture of poultry, a wire frame is used, then wrapped with threads. A semicircle cut out of cardboard serves as the basis for the tail.

Another manufacturing method is from threads. You can make a pink chicken, for example. Manufacturing will not take much of your time.

Make paired cardboard blanks. Wind the threads until the hole is completely filled. Cut from the outer edge, thread through, tie a knot. Thus, fluffy balls are made to decorate other products.


conclusions
Birds are popular among lovers of home art. Various materials and manufacturing techniques are used as a material. It can be plastic bottles, colored paper, threads, other improvised means. Manufacturing techniques differ in complexity, you can choose the one that suits you.

With the help of such art, you can have a good time with children, have fun. At the same time, the decoration will delight the eye for a long time.

Do-it-yourself bird photo


For preschoolers, it is also a great way to develop fine motor skills and speech. Allow your child to work more with plasticine, even if it leads to a little mess in the house - such a pastime is extremely useful for the development of the baby.
Prepare a simple pinecone, a sculpting litter, a few pieces of brightly colored clay, and a stack. Blind a ball-head (you need a bright yellow plasticine), as well as orange wings and a stand, a red beak and blue balls-eyes. Fix all the blanks made on the cone, and then put the cone itself on a plasticine stand. So a wonderful bird is ready - an excellent "tinker" for children 3 years old!
Plastic bottle
You will need to prepare for work a large bottle of white dense plastic with a handle, scissors, and a marker. First, wash the container thoroughly so that there are no traces of the contents in it. Be sure to remove all labels. Draw lines on the plastic surface with a marker - measure a couple of centimeters from the bottom to remove the bottom. Next, on the side opposite to the handle, draw a line along the seam. Draw an arch near the neck.
Please note that when cutting out the bottle, place it on a stable surface such as a table or floor. Cut off the bottom first, and then follow the seam line. To cut the beak, move from the cut seam to the neck in a curve. Stop at the thread line.
To make the beak, the cut piece should be turned into the neck of the bottle. Step 2 cm from the handle and cut out two wing arches on the sides.
Place the workpiece with the handle down. Hold and gradually turn inside the sidewalls, now you just need to work a little on shaping and the wonderful bird is ready!
Thread craft
Such a craft is also quite simple and can be done with a child of three years of age. First, you should cut out a cardboard rectangle with sides of 20 and 14 cm.Wrap about 60 turns of black yarn on it along the long side, it should be voluminous and dense. Cut in half and set the threads aside.
Now wind about 40 turns of red yarn along the short side of the rectangle, and do the same with gray.
Now start shaping the body of the bullfinch. Lay the red blank across the black one and cross it. Just tie the gray threads in half.
Form a ball with a diameter of 5 cm out of cotton wool or synthetic winterizer and wrap it with gray threads. Lay the black threads on top, which will play the role of the head and back of the feathered one, and form the sides from the red threads. Fix everything from below with a thread.
Release the threads and shape the head, while not tightening very tightly. The beak can be made from seeds, and beads can be used for the peephole. The child will surely enjoy doing
Summary: Bird crafts from paper. Craft a bird with your own hands. How to make a paper bird. Spring crafts for children. Children's spring crafts from natural materials.
Most faithful friends Springs are birds. In spring, nature awakens from hibernation, trees are filled with life-giving sap - life is everywhere! And birds are the first to remind us of this. The hubbub of birds welcomes the rebirth of nature with overwhelming power. For this reason, we could not fail to include in our section "Spring crafts with children with their own hands" a selection article "Crafts of birds from paper and fabric". We will teach you how to make paper birds. Using our ready-made templates and detailed instructions, you can make an original spring craft - the Spring Birds mobile, which will decorate the interior in your home. You will also learn how to sew beautiful birds from fabric.
1. Crafts of a bird. Paper birds
A very simple spring craft for kids. To make these cute paper birds, you'll need scrapbooking paper, colored paper clips, glue, and a hole punch.
Download the bird template from the link >>>> Print, cut out. To craft one bird, you will need two mirror pieces. Before glueing them together, take two paper clips, straighten them to get "bird's feet". Place them between the two sides of the bird, glue the sides together. Punch the eye with a hole punch. Children's spring craft is ready!
2. Crafts bird. How to make a paper bird
We present to you another simple spring paper craft. It can be done in just 10 minutes.

And one more spring craft - a mobile from the well-known blog madebyjoel.com On this site you will also find a video instruction. The template can be printed from the link.
4. Children's crafts spring. DIY bird crafts
If you don't know how to make a paper bird, then be sure to visit the Bulgarian website Krokotak.com. There you will find two great spring crafts for children: a white stork and a swallow.
White paper stork. How to make a paper stork

The white stork is an exceptionally positive symbol for most of the peoples of Europe, Asia, America and Australia, the emblem of the sun, peace and goodness. A stork that arrives from warm regions in late March or early April is quite naturally associated with spring and the beginning of a new life. Since a large, proud bird is not at all afraid of humans and makes nests on the roofs of houses or on the tops of nearby trees, returning annually to its old, habitable place, people are used to considering it as a guardian angel of the hearth, as a peaceful symbol of constancy and well-being.
The storks in the photo below are made from cardboard disposable plates and disposable plastic spoons. The paws of the birds are made of small coffee spoons. To make this DIY spring craft, you will need a glue gun.

Paper swallow. How to make a paper swallow

The grass turns green
The sun is shining;
Swallow with spring
In the canopy flies to us.
(Alexey Pleshcheev)
Probably, the swallow is second only to the white stork in popularity. The attitude of the people towards her is especially warm and kind. And of course, she is a symbol of spring, the return of the sun. The Hermitage contains a Greek vessel - a pelica with a wonderful drawing: an adult man, a young man and a boy joyfully greet the swallow that has returned in the spring.
Note: the eyes of the swallow are glued on the purchased ones (the so-called "eyes for dolls"). You can buy such eyes, for example, in the Read.ru online store. See link >>>>
5. Crafts on the theme of spring. Bird crafts
From an ordinary paper plate, you can make an original craft on the theme of spring - a bird in a nest. For decoration, it is appropriate to use decorative feathers.

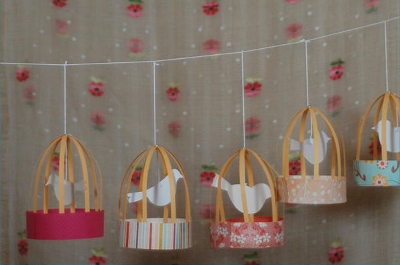
Of course, it is not good to keep live birds in a cage, let it be better if they fly free. We will make a spring craft bird in a cage made of paper and a plastic cover. For a detailed master class, see the link.
See what cute birdhouses, together with the tenants, can be made from the so-called. waste material. It is appropriate to decorate the wall in the children's room with such a spring craft. The birdhouses themselves are made from cardboard bags made from milk or juice. Outside, they were painted with acrylics. The birds were made from plastic containers from kinder surprises.

Such bright spring birds on wires can be easily and simply drawn using fingerprints.


This spring birdie applique is made using paper cupcake molds. Even a small child can make such a spring craft. The molds must be folded (or cut) in half, glued to paper, and then painted with paws, beaks and eyes for the birds.

6. How to make a bird out of fabric. How to sew a birdie from fabric
Birds can be made not only from paper, but also from fabric. Felt is best suited for these purposes. You can decorate a bouquet of spring twigs with ready-made fabric birds.
Bulky paper birds can become an original decoration.
In addition, the bird is hollow and you can put a small thing in it and give it to your loved ones!
you will need:
- a printer,
- hot glue gun or fast drying glue,
- two sheets of medium-weight paper,
- scissors.
Print out the details of the bird and cut it out neatly.

The sequence of assembling a paper bird, look at the video:
Advice:
If you cut out parts from thick cardboard, then in the future they can be reused as a template.
Martin
See how you can make such a cute swallow out of paper:
You will need black, white and red colored paper, glue, stapler, scissors.
Let's get started.
First you need to cut out the details shown in the figure from colored paper. 
Now let's take a small strip of black paper - this is the future head of the swallow. We will fold it with a ring and fasten it with a stapler. The big black stripe is the future torso of the forked-tailed bird. We will fold it and fasten it with a stapler, as shown in the figure. 
Then we glue the "shirt-front" of white paper to the body and head of the swallow. Do not confuse: the shorter piece is towards the head, and the longer piece is towards the body. 
connect the head and body of the bird with glue or a stapler.
The next step is to glue the wings to the body.
Then we will arrange the head of the swallow - glue the eyes. They can be purchased at a sewing supply store or simply glue together from larger white paper circles and smaller black circles.
It remains to glue the beak. Take the remaining diamond-shaped piece of red paper, fold it in half and glue it to the bird's head.
Our wonderful paper craft is ready! It was not difficult to make it. Children will be happy to play with this swallow, and in the process of making it they will learn how to make voluminous paper crafts with their own hands. 
Paper swallow - costume element 
Volumetric birds
These birds will consist of the same elements - body, head, tail, beak and eyes.
First you need to prepare strips of certain sizes, depending on which part of the bird they will be used for.
So, for the body you need 5 paper strips 2.5 cm wide and the following lengths - 7.5; ten; 12.5; 15; 17.5 cm.
For the head, two strips of the same width, the lengths of which are 6.25 and 8.75 cm,
and for the beak, the strip should be 5 cm long.
For the tail, you need to prepare 5 strips, 3.75 cm wide, the length of which will be 5; 7.5; ten; 12.5; 15 cm.
You should also cut out two circles, 1 cm in diameter - these will be the eyes of the bird.
A paper strip bird can be made as follows:
workpieces for the body should be twisted into a circle and the ends glued. Then put all the circles into each other and glue at the base.
Until it dries completely, it is better to fix the bonding place with a clothespin.
Similar actions should be done with blanks for the head.
When both parts of the bird are ready, you need to connect them and start making the tail.
The tail strips should be triangular with scissors and the wide ends curled slightly.
Next, lay the parts on top of each other and glue them on the narrow side, and then attach to the body.
The beak and eyes remained.
To make the first, you need to fold the strip in half, then bend the corners from the side of the bend and fold them inward.
The eyes are made by winding a small circle around the tip of a toothpick until a ball is obtained. Now you need to attach the last two parts to the corresponding places - and the craft is ready. 
Bluebird from egg


