Which Nikon camera has a removable infrared filter. Infrared filters for photography. Differences between black and white and infrared images
We need a piece of non-overexposed, but developed reversible (that is, "slide") film. Shooting with a digital camera through this slice of the slide, we get infrared images. In this case, the film acts as an infrared filter.
The fact that such a film looks absolutely opaque and has a black color should not alarm us. The developed emulsion itself, not illuminated, delays the radiation of the spectrum range to which the film is sensitive (that is, the entire visible range), passing everything else (that is, the ultraviolet and infrared ranges). But, despite this "democracy" of the emulsion in relation to the invisible range, the plastic backing of the film is not able to transmit ultraviolet light. Therefore, the combination "emulsion / substrate" is left to transmit only infrared radiation.
The matrix of a digital camera, as we know, is capable of fixing it, despite the efforts of manufacturers in the opposite direction. Since the lens of a camera, especially a reflex camera, has a fairly large diameter, it is recommended to use 120 format film. The width of such film is 6 cm, so you can cut a piece of the desired size from it, unlike narrow-format film. It is not at all necessary to buy such a film and immediately show it: ready-made unnecessary trimmings can be obtained from the operator in any prolapse. As a holder of such a "light filter", you can use everything that is at hand, including the hand itself. If our homemade IR filter has a convex-concave shape, then it must be straightened by putting it in the middle of a heavy book for a couple of days.
It is better to use Fujichrome Velvia 100F or Agfachrome RSX II 100, which gives no worse results.
The disadvantages of the described method include a lower contrast, compared to real infrared images taken through a filter, and low mechanical strength of a homemade "filter".
How do IR cameras work?
Infrared radiation is a type of radiation that cannot be seen with human eyes. Its wavelength is longer than that of light in the visible spectrum. Infrared illumination allows the camera to “see” even in complete darkness. This is possible with a lamp or diodes that emit infrared light of a specific wavelength. Three wavelengths of 715 nm, 850 nm and 940 nm are common to infrared illuminators. The human eye is able to see up to 780 nm and therefore can see lightly illuminators that use 715 nm. True covert night surveillance requires the use of IR illuminators operating at 850nm and 940nm.
The light from the lamp is filtered so that only predetermined wavelengths of 715 nm, 850 nm and 940 nm are emitted.
DIY infrared filter for creative lighting nikon
These numbers are the starting points for the frequency of the waves emitted - they are the absolute lower end of the spectrum used by the camera. If a person gets close enough, he can understand that the camera is infrared, although he will not be able to see the wavelengths used.
The ability of a camera to capture images based on light levels is measured in lux. The lower the lux value, the better camera can see in low light conditions. All IR cameras have a 0 lux value, which means they can see in pitch darkness. Color IR cameras switch to black and white for video surveillance at night to achieve maximum sensitivity. A photocell inside the camera monitors daylight and determines when switching is necessary. A distinction should be made between IR cameras and Day / Night cameras. Day / night cameras can work effectively in low light conditions, but they are not equipped with LEDs, which makes them impossible to operate in complete darkness, unlike cameras with IR illumination.
When using infrared cameras for outdoor use, it is better to use ready-made sets of outdoor video cameras with a casing or cameras with an IR illuminator. Combining indoor IR cameras with an outdoor enclosure may not work well enough because IR light may be reflected off the enclosure glass. In addition, when purchasing an IR camera or illuminator, you should always look at the beam range value. Installing IR cameras in the room with a wider range than the room size can result in blurry images. It should be noted that infrared cameras cannot see through smoke. In order to achieve this, a thermal imaging camera must be used.
Translated by Hi-Tech Security. Source: http://www.surveillance-video.com/ea-ir.html
Homemade infrared filter
I think not everyone knows what infrared photography is, but in vain, it's quite an interesting thing. You can make an infrared filter from photographic film, but this article will talk about how to make an IR filter from a CD. The CD itself must be dark red and are sold in many stores. What we need first of all is to take a cover from any plastic bottle, in my case it is mineral water, and cut a hole as large as possible. The plastic bottle cap worked well as a lens attachment.
Photo # 1
 Next, the cut out hole needs to be cleaned of burrs and painted with black auto paint from a spray can or any other - just to hold on.
To clean the disc from the top layer, you need to draw a line with a knife from the middle to the edge, and under the pressure of water, the top layer will quickly be washed off. Then you need to cut three or two squares of the same size from the disk and glue them. Our homemade filter is ready, all that remains is to stick it on a pre-prepared plastic bottle cap. Done, put the filter on the soap dish and go take pictures.
Photo # 2
 We will take pictures in the photography mode “ M”, Since we need access to all the settings of the soap dish. It is advisable to take a tripod, but since I photographed in summer on sunny days, there was enough light, at ISO 200 it was possible to photograph landscapes handheld, the aperture was opened, which reduced the sharpness of the picture.
Photo # 3
 With additional processing in Adobe photoshop
You can get a variety of results: reduce noise, tint or color the photo as you like.
With additional processing in Adobe photoshop
You can get a variety of results: reduce noise, tint or color the photo as you like.
Photo No. 4
 The pictures show that the infrared filter from the CD is not sharp enough, moreover, it rather creates the effect of a monocle. If you look at the channels of the image, then the red is constantly overexposed, and if it is present, then its sharpness is extremely low, the blue channel is the most contrasting, the green is wrong, but the image is clearly visible.
Photo # 5
 Photos taken with this filter resemble infrared images: green foliage brightens, blue skies and water darkens.
Photo # 6
 And if your camera supports RAW format, the image can be made much more attractive, give it a try and I'm sure you will succeed as well! About fotomtv.
Why do I need SplitCam?
The free SplitCam webcam software allows you to add colorful webcam effects to your videos that will add fun to you and your friends! In addition, SplitCam is a simple and convenient way to split a video stream from a webcam.
DIY infrared digital camera
With SplitCam, you can video chat with all your friends, share videos on online services, and all at the same time! Read more ...
Colorful webcam effects
Add our webcam effects to your video during video calls
and get a lot of positive emotions from communicating with your friends! Examples of cool effects of the SplitCam program: distorting a face and replacing a face with another object, distorting a mirror, substituting a background ...� Separation of video stream and connection of multiple applications
With SplitCam you can connect your webcam to several applications at once
and not get an error with the message that "the webcam is already in use."
Believe me, your webcam can do more!� Realistic 3D masks
A simple program for webcam SplitCam allows you to virtually replace your head with any 3D object. The 3D webcam effects are especially attractive. This can be, for example, the head of an elephant or other animal, which repeats all the movements of your real head. You can also appear in front of your interlocutor in a 3D mask from a popular movie, for example, in the mask of Darth Vader.
Support for all popular services
Skype, Windows Live Messenger, Yahoo Messenger, AOL AIM, ICQ, Camfrog, Gtalk, YouTube, ooVoo, Justin.tv, Ustream and others ...
Broadcasting videos on popular services
Send videos to Livestream, Ustream, Justin.tv, TinyChat and other services in a few clicks. Free webcam software SplitCam will make your broadcasts more vivid and flexible.
Support for various video resolutions, including HD
Send video from HD camera without loss of quality. Choose any of the available resolutions: 320 × 180, 320 × 240, 400 × 225, 400 × 300, 512 × 384, 640 × 360, 640 × 480, 800 × 600, 960 × 540, 1024 × 768, 1280 × 720, 1280 × 960, 1400 × 1050, 1600 × 900, 1600 × 1200, 1920 × 1080, 1920 × 1440, 2048 × 1536
� Various video sources
With SplitCam you can distribute video from a webcam, from a video file, slideshow or desktop (whole desktop or a selected part of it)!
��Using an IP camera as a source
Connect to any IP camera and send video from it to your favorite video messengers and video services.
Small but useful video features
Record video without specialized software and upload it to YouTube in a few clicks directly from the SplitCam window!
Zoom in / out video (Zoom)
In SplitCam, you can enlarge and stream only the portion of the video you want. You can zoom in / out the video using the keyboard and mouse.
In addition to all well-known paints for painting, there are also special types of paints. They are used to protect the barcode and block infrared rays. Knowledge about them will expand our horizons and may even come in handy.
- Barcode (barcode) protection paints. Designed to protect the original barcode from photocopying.
- IR-blocking - paints that block infrared rays. Designed for printing on transparent PVC films, for the production of transparent plastic cards. These paints block or reflect infrared light. Sources of radiation: ATMs or other similar reading devices.
Barcode (barcode) protection paints
These inks are designed to protect the original barcode from photocopying. In the case of using such a black ink, the original barcode will always be invisible to human vision. You can also apply this blocking paint underneath the overlaminate and then print the original barcode on top of the card. After lamination, it is no longer possible to separate the top layer from the base without damaging the barcode. All of these paints are carbon-free.
Standard colors:
- S 3374- red ink blocking barcode that can be read with optical readers.
- S 4500- black and blue ink blocking barcode that can be read with infrared readers.
- S 4501- black and brown ink blocking a barcode that can be read with infrared readers.
Seal: Suitable for all types of stencils, except for Stenplex Amber and Solvent self-adhesive films. It is recommended to use monofilament nets 77 T-90 T. When using a nets with meshes of 90 T, the coverage of the paint is 35-35 sq. M / kg.
Anchoring:
Drying takes from 30 minutes to 1 hour depending on conditions. You can use jet drying.
Lamination: These inks can be printed directly over a printed barcode or over laminated film and then laminated in the usual way.
Usage: Production of credit cards and tickets where barcode protection from photocopying is required.
Barcode blocking inks can also be supplied for printing on polyester films
IR-blocking
These paints are transparent paints that block or reflect infrared light. Sources of radiation: ATMs or other similar reading devices.
Standard colors are transparent yellow and green.
Do-it-yourself infrared filter from a CD to a soap dish
These paints have different reflectivity. They are intended for printing on transparent PVC films, for the production of transparent plastic cards. These inks can be printed both on base films and on lamination films.
Standard colors:
- S 17699- green IR blocker with a maximum absorption of 860-900 nm
- S 18203- yellow IR blocker with a maximum absorption of 980 nm
Both of these colors match ISO standard when printing through a 90T mesh. - S21143- highly concentrated IR blocker with a maximum absorption of 980 nm
This ink meets the ISO standard when printing through 120T mesh.
For other colors, you can overprint these inks with other transparent inks.
Seal:
Suitable for any type of stencil, except for Stenplex Amber and Solvent adhesive films. It is recommended to use monofilament mesh no. 90T, while the coverage of the paint is 60 m2 / kg.
Anchoring:
Drying takes from 30 minutes to 1 hour, depending on the drying conditions. You can use jet drying.
Lamination:
These inks can be used to print directly onto backing films or laminates, then laminated in the usual way.
Usage:
Production of transparent credit cards for reading information by means of infrared readers and for identification by ATMs.
"Cool Physics" - on Youtube
Infrared and ultraviolet radiation.
Scale of electromagnetic waves
« Physics - grade 11 "
Infrared radiation
Electromagnetic radiation with frequencies in the range from 3 10 11 to 3.75 10 14 Hz is called infrared radiation.
It is emitted by any heated body, even if it does not glow.
For example, radiators in an apartment emit infrared waves, which cause noticeable heating of the surrounding bodies.
Therefore, infrared waves are often referred to as heat waves.
Infrared waves that are not perceived by the eye have wavelengths exceeding the wavelength of red light (wavelength λ = 780 nm - 1 mm).
The maximum radiation energy of an electric arc and incandescent lamp falls on infrared rays.
Infrared radiation is used to dry paint and varnish coatings, vegetables, fruits, etc.
Devices have been created in which the infrared image of an object that is not visible to the eye is converted into a visible one.
Binoculars and telescopic sights are made to see in the dark.
Ultraviolet radiation
Electromagnetic radiation with frequencies in the range from 8 10 14 to 3 10 16 Hz is called ultraviolet radiation(wavelength λ = 10-380 nm).
Ultraviolet radiation can be detected using a screen covered with a luminescent substance.
The screen begins to glow in the part on which the rays fall, lying beyond the violet region of the spectrum.
Ultraviolet radiation is highly reactive.
Photoemulsion has an increased sensitivity to ultraviolet radiation.
This can be verified by projecting the spectrum in a darkened room onto photographic paper.
After development, the paper turns black beyond the violet end of the spectrum more than in the visible spectrum.
Ultraviolet rays do not produce visual images: they are invisible.
But their effect on the retina and skin is great and destructive.
The sun's ultraviolet radiation is not sufficiently absorbed by the upper atmosphere.
Therefore, high in the mountains you cannot stay for a long time without clothes and without dark glasses.
Glass goggles, which are transparent to the visible spectrum, protect the eyes from ultraviolet radiation, as the glass strongly absorbs ultraviolet rays.
However, in small doses, ultraviolet rays have a healing effect.
Moderate sun exposure is beneficial, especially at a young age: ultraviolet rays contribute to the growth and strengthening of the body.
In addition to direct action on skin tissues (formation of a protective pigment - sunburn, vitamin D 2), ultraviolet rays affect the central nervous system, stimulating a number of important vital functions in the body.
Ultraviolet rays also have a bactericidal effect.
They kill pathogenic bacteria and are used for this purpose in medicine.
So,
The heated body emits predominantly infrared radiation with wavelengths exceeding the wavelengths of visible radiation.
DIY infrared filter # 2
Ultraviolet radiation is shorter wavelength and highly reactive.
Scale of electromagnetic waves
The length of electromagnetic waves varies over a wide range. Regardless of wavelength, all electromagnetic waves have the same properties. Significant differences are observed when interacting with matter: the absorption and reflection coefficients depend on the wavelength.
The length of electromagnetic waves is very different: from 103 m (radio waves) to 10 -10 m (X-rays).
Light makes up a tiny fraction of the wide spectrum of electromagnetic waves.
When studying this small part of the spectrum, other emissions with unusual properties were discovered.
The figure shows a scale of electromagnetic waves indicating the wavelengths and frequencies of various emissions:
It is customary to highlight:
low frequency radiation,
radio emission,
infrared rays,
visible light,
ultra-violet rays,
X-rays,
γ-radiation.
There is no fundamental difference between individual emissions.
All of them are electromagnetic waves generated by charged particles.
Electromagnetic waves are detected mainly by their action on charged particles.
In a vacuum, electromagnetic radiation of any wavelength propagates at a speed of 300,000 km / s.
The boundaries between the individual areas of the radiation scale are rather arbitrary.
Radiation of different wavelengths differ from each other in the methods of their production (antenna radiation, thermal radiation, radiation during deceleration of fast electrons, etc.) and in the registration methods.
All of these types of electromagnetic radiation are also generated by space objects and are successfully investigated using rockets, artificial earth satellites and spacecraft.
This applies primarily to X-rays and y-rays, which are strongly absorbed by the atmosphere.
As the wavelength decreases, quantitative differences in wavelengths lead to significant qualitative differences.
Radiation of different wavelengths are very different from each other in their absorption by matter.
Shortwave radiation (X-rays and especially γ-rays) are weakly absorbed.
Substances opaque to optical wavelengths are transparent to these radiations.
The reflection coefficient of electromagnetic waves also depends on the wavelength.
A bit of theory
The boundaries of the visible (eye) range are considered to be ultraviolet UV (380 nm) and infrared IR (760 nm). All that is behind them, the eye does not distinguish. The retina is, in fact, also sensitive to the shorter wavelength region of the spectrum. But the lens and vitreous body protect it from relatively "hard" radiation. Nevertheless, the retina can perceive the "remnants" of ultraviolet radiation in the form of a fluorescent bluish glow of the lens (re-emission in a longer wavelength region of the spectrum). We do not see in the IR range, because otherwise we would blind ourselves with our own heat.
Beyond the visible range of the spectrum, the radiation does not end. And the mechanisms and principles of optics continue to operate (there are also lenses and mirrors). Radars see in the invisible zone of the radio range (even longer wavelength than IR), and dish mirrors for radio waves spoil everywhere architectural views... Light sources shine in both the IR and UV range. And in the mountains and by the sea, you cannot do without a UV filter, otherwise what is invisible to the eye can significantly spoil the pictures (there is no haze near the sea and in the mountains that absorbs ultraviolet light). Diffuse light, haze creates the impression of depth in space, but if you need a sharp black and white image for distant objects, put an orange filter on the camera.
The UV zone conventionally extends to 1 nm, and the IR zone to 1 mm. The atmosphere (ozone, vapor, dust) strongly absorbs and scatters a section of the 10-300 nm range, and glass cuts off longer waves, therefore, for photography (without additional sources light and special lenses), you can actually use only the near zone UV - 300-400 nm.
The main limitation is still photographic materials. Non-sensitized light-sensitive materials are sensitive in the range of 350-450 nm, so at the dawn of photography, nothing but “blue” and UV could be captured. But in the darkroom when printing, you can use red and green filters and control the development process visually. For shooting in the infrared range, special photographic materials are needed. Typically, IR films require special storage and operation conditions, and the camera body should not be "transparent" to the rays that illuminate the IR film.
To illustrate the different aspects of visible and invisible photography, consider the following flash video. It graphically presents (conventionally, but close to real values): the spectrum of colors visible to the eye, spectra of light sources, spectral sensitivity of the eye and photographic emulsions, spectral characteristics of filters and glass. By default, only the visible spectrum is enabled. In order to understand what can be removed with a certain emulsion with a certain light source and with a certain filter, you need to “turn on” (put a tick) on the necessary elements. The intersection will leave that part of the spectrum that will be filmed or visible.
Note the following important points for photography:
1) the spectral composition of light when the Sun is at its zenith allows shooting in both the IR and UV ranges, and this is the only powerful and versatile light source; the light of the Sun above the horizon is almost completely devoid of the UV component;
2) an incandescent lamp is good only for IR shooting;
3) flash light contains both IR and UV radiation;
4) the maximum sensitivity of the eye under normal illumination is about 555 nm, and at twilight about 510 nm (Purkinje effect);
5) almost all photographic materials are suitable for UV photography, and for IR only infrachromatic;
6) optical glass with increasing thickness "cuts off" more and more ultraviolet radiation; for photography it is better to use old lenses or special modern ones;
7) the filter on the digital camera matrix cuts off a significant part of the IR and UV radiation;
8) the degree of transmission of radiation from filters and optical glass depends on their thickness; some filters that are opaque to visible light can transmit both IR and UV at the same time.
For photography in "invisible" rays we will use digital cameras. The well-known test for "sensitivity" to the IR range - remove the remote control (the IR source is directed into the camera lens, the button on the remote control is pressed) allows you to determine whether the camera is suitable for IR shooting. If the glow of the IR source of the remote control is clearly visible on a photo or display of a compact camera, it is suitable. A filter is usually installed on the matrix, which significantly cuts off IR and UV radiation, therefore, to shoot in this range, you will need long exposures and filters that cut off visible light even more efficiently (thin ebonite plates are also used). Below is a table of common IR filters from different manufacturers, which indicates the cutoff limits and 50% IR transmission.
For photography, we used domestic filters UFS 6 (4 mm), IKS 1 and higher contrast IKS 3 (2.5 mm), Canon EOS 300D and Canon PowerShot G2 cameras, and Cokin mount kits. It was not possible to fit the relatively thick filters into standard Cokin filter holders, so the filter was simply attached with rubber bands to the Cokin ring. If you still manage to attach the filter to the Cokin holder in a standard way, cover all the slots well with foil, otherwise at long exposures the remnants of visible light will illuminate the matrix more than IR.
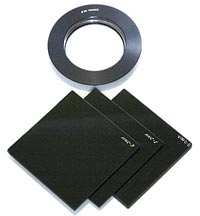
Cokin ring and filters
When photographing in the IR and UV range, there are two "difficulties" in which the performance characteristics of the "number" prove to be very useful. These difficulties are exposure determination and focusing. Since "by eye" neither one nor the other cannot be adjusted in the case of an "invisible" light, you have to make several takes and make the necessary adjustments based on the picture on the display. Determining the exposure is easier than getting the right focus. After all, the focus for the "green" visible rays and IR or UV do not coincide (therefore, in good modern lenses, these rays are invisible to the eye, but visible by the film, they try to completely cut off so that they do not reduce the sharpness and contrast visible on the print). You have to set the distance to the eye and aperture the lens. Compact digital cameras like Canon G2, having a small matrix and a larger relative depth of field at the same aperture, are more convenient for the first method (focusing on the eye). But with an exposure of 10 seconds and a sensitivity of 400, the picture is very noisy. With a DSLR I will have to do more takes, try different focusing distances, but the image will be cleaner.

On good lens there is usually a special mark (red “R” line) for IR imaging. This is certainly a plus, but there is no universal line for different IR filters and films, just as there is no one for UV. Therefore, the sampling method, in general, is the only one.
Photo
sunny day

Canon EOS 300D, ISO 100, f / 9.0, 1/200 sec.

IKS 1, Canon EOS 300D, ISO 800, f / 11.0, 15 sec.

IKS 1, Canon EOS 300D, ISO 800, f / 11.0, 15 s, Photoshop processing.
It's a nasty day

Several years ago, I first heard about infrared photography and the amazing possibilities it offers to the amateur photographer. Unfortunately, there was too little information on this topic on the Internet and it was often contradictory. In particular, many sources indicated that infrared photography is completely impossible for owners of SLR digital cameras.
1. General information about infrared photography
There is a lot of information on the infrared spectrum in the network, so I will limit myself to a short description.
The infrared spectrum is divided into approximately three areas, the boundaries between which are not strictly defined:
Near (IR-A): 750-1400 nm
Medium (IR-B): 1400-3.000 nm
Far (IR-C): 3.000-1.000.000 nm (0.003-1 mm)
The difference between them lies in the ability to transfer energy to water molecules and, thus, living organisms. Far infrared radiation with this ability is perceived by us as heat. The matrix of a digital camera cannot record waves in this part of the spectrum, therefore, only near infrared radiation is of interest for infrared photography.
The effects that IR photography can achieve are related to the amount of light reflected from various materials. As you can see from the graph, foliage reflects infrared rays much more strongly than visible light, while water reflects visible light and absorbs infrared radiation.
Percentage of reflected light depending on wavelength and material. The dotted line roughly marks the beginning of the infrared spectrum.
Original graphic: © J. Andrzej Wrotniak
Once again, I want to emphasize that the results of infrared photography have nothing to do with either radiated or reflected heat waves. Heat waves lie in the IR-C range and if they do affect the matrix of digital cameras, then only as an increase in noise from heating of photosensitive elements. However, these parts of the spectrum are often confused because objects that reflect far thermal infrared radiation most often reflect near IR-A radiation. So the foliage, which reflects heat rays, in order to avoid overheating, also reflects almost the entire spectrum from IR-A to IR-C. Therefore, needles and leaves appear light in IR photographs. This phenomenon is called the Wood effect, but not by analogy with the forest, but in honor of the photographer Robert Wood, who, in 1910, was the first to publish infrared photographs taken with a special, experimental type of film.
2. Infrared filter
Despite the fact that the matrices of digital cameras are sensitive to infrared radiation, their sensitivity to visible light is hundreds, if not thousands of times higher, therefore, in order to take an IR photograph, it is necessary to block visible light. Infrared filters block radiation from different wavelengths and, depending on the manufacturer, may also be named differently. The table shows the names and characteristics of some of them. The last column indicates the wavelengths at which the filter bandwidth is 50%. Heliopan filters are made from Schott glass and bear the same names. In some sources, you can find slightly different data. A. Vrotnyak gives a table in which RG695 and B + W092 correspond to characteristics # 89B and R72. Judging by the photos I found on the net, this is not true. The RG695 filter lets in too much visible light and it is impossible to take high-quality infrared photos with it. The pass-through characteristics of the Cokin 007 filter, judging by the pictures taken with Canon cameras, also do not match the characteristics of the Hoya R72.
Infrared and dark red filters
© Gisle Hannemyr
Filters and their capacity
© J. Andrzej Wrotniak
From the graph showing the transmission capacity of various filters as a function of wavelength, it follows that some filters also transmit part of the visible light, the red part of which ends at 700-720 nm. This is not a disadvantage for the photographer. Matrix elements responsible for different colors, are differently sensitive to infrared light and to small amounts of red penetrating through the filter, so the so-called pseudo colors are obtained in the photograph. For this reason, the Hoya R72 (# 89B) filter, which blocks radiation from 680 nm, is best suited for digital infrared photography. On the one hand, it allows some visible light to pass through, which shortens the exposure time; on the other hand, it allows typical infrared photographs to be taken.
If you are sure that your camera has sufficient infrared sensitivity, you can experiment with the "black" filter B + W 093 (# 87C), which blocks the entire visible spectrum and makes it possible to take monochrome photographs, increasing the shutter speed by an average of two stops. compared to R72. However, the photographs taken by # 87C are practically indistinguishable from the photographs with the Hoya R72 filter, so this does not give anything but extra exposure steps.
An alternative to spin-on filters is the Cokin 007 filter, also referred to as Cokin # 89B, and theoretically passes the same portion of the spectrum as the Hoya R72. In addition to the inconvenience inherent in all Kukin filters (scratches, fingerprints), the Cokin 007 has a problem with light penetrating between the lens and the filter over a long exposure time. I tested this filter only once and gave it up for this very reason - in the light from the side or back, the glare in the photo is too strong to be undetectable. However, this article will show you how to get rid of this problem with a simple rubber / fabric belt. In addition, although the specification of the Cokin 007 filter has the same properties as the Hoya R72, the manufacturers most likely could not, due to the nature of the material, match the throughput of the 89B. In photos taken with Canon cameras through the Cokin 007, the infrared effect is noticeably weaker than when using the Hoya R72.
The cheapest way to filter visible light is to use developed, underexposed slide film instead of the filter. This option has been tested by many photographers, but I have not tested it myself, so I can't say anything about the advantages and disadvantages.
If you decide in favor of a screw-on filter or a Cokin filter, I advise you to first find out which of the available lenses are suitable for infrared photography, then buy a filter or holder for the largest diameter, and for the rest of the lenses buy adapter rings. About lenses suitable for IR photography - just below.
Yes, I almost forgot - despite the fact that dark filters like Hoya R72 do not transmit visible light, you should not look at the sun through them. Although almost nothing can be seen through them, they perfectly transmit infrared and ultraviolet rays, so the retina of the eye is unlikely to like such experiments. If you know people who, for the sake of interest, spent many hours looking at the sun through infrared filters, please write to me how they are doing.
3. About the filter that interferes with the life of the IR photographer
Before you consider buying an IR cut filter, you should make sure that your camera is capable of taking infrared photos. In fact, I have not yet heard of cameras that would be completely unsuitable for this purpose. The sensors of all digital cameras are sensitive to infrared light, but the point is in the so-called Hot-mirror filter that blocks infrared light. This filter is located directly on the matrix and is intended in order to avoid false color displays, which are introduced by infrared radiation. The difference in exposure between visible and infrared light, 11-13 stops, like the Canon 5D or Nikon 200D, is enough for infrared rays to have no effect in normal photography. But even lower values like the D50 / D70 (they say 6-8) are also quite acceptable. With such a difference, the influence of infrared light is so small that it does not affect the contrast and colors of the image.
On the Leica m8 (September 2006) cameras, this anti-IR filter was not very effective (if any), resulting in the distortion of the gray shades of clothing towards the magenta. Leica had to solve the problem by sending the camera owners free filters blocking IR light. Such is the joke of humor. This is all the more strange when you consider that the problem was known from other cameras.
In some cameras, for example, Sony, it is possible to remove the Hot-mirror filter from the matrix by switching to Night Shot mode. Unfortunately, the minimum shutter speed is limited by a rather high value. The reason for the limitation is the ability of IR-A rays to penetrate some textile materials, especially light colors. The early models of Sony camcorders, according to the network, thus allowed to capture much more than the subjects would like, especially in sunny weather on the beach. After this fact became known, video cameras were quickly withdrawn from sale, and since then, just in case and for everyone Sony cameras the minimum exposure limits are set in the night mode. I haven’t used Sony camcorders, so I don’t know how they dealt with this problem. As far as the ability of Canon cameras to show through clothing is concerned, my experiments with different materials were unsuccessful. On the contrary, some materials, such as polyamide, shine through in sunlight much more strongly in ordinary photographs than in infrared.
When Canon announced the new 20Da model in February 2005, with an increased filter bandwidth in the 656nm region and specifically designed for astrophotography, IR photography enthusiasts were excited. But the revival quickly subsided when it became known from the 20Da specification that infrared waves from 700 nm are blocked in this camera in the same way as in 20D, that is, very much. Despite this, with a Hoya R72 filter that allows some visible light to pass through, 20Da is about 5 stops more IR sensitive than 20D.
Many sources indicate that the Hot-mirror filter prevents the appearance of moiré. This is not true from a technical point of view. Moire appears in photographs of mesh or linear structures, like mosquito nets. This happens due to the imposition of a periodic pattern transmitted by the lens on the photosensitive elements of the digital camera matrix, which is also a periodic discrete structure. A similar effect can be seen if two small-mesh mosquito nets are placed on top of each other at an angle. One mesh in our case is the subject of the survey, the other is the matrix. In short, infrared rays have nothing to do with it.
Against moiré, a so-called Low-pass filter is installed on the matrix, which slightly blurs the image. A Hot-mirror filter is installed against the influence of infrared light, usually a deposition on a Low-pass filter that reflects infrared rays, preventing them from reaching the matrix. The Low-pass filter itself also blocks some of the infrared rays, but this is more a side effect of the material from which it is made, rather than its main purpose. That is, the thing that lies on the matrix of most digital cameras is a sandwich of Low-pass and Hot-mirror filters (dusting), the thickness of which can vary independently of each other. In some cameras, this sandwich also includes a filter that additionally absorbs infrared rays.
For cameras from different manufacturers, the filter on the matrix differs by device. So, on the Canon 5D camera, the matrix contains a combination of two Low-pass filters; a filter that absorbs infrared rays; a filter that converts linearly polarized light to circularly polarized; plus sputtering Hot-mirror (5D-White Paper, page 7, pdf). In some sources, they are collectively referred to as an anti-alias filter (AA filter), although only the Low-pass filter is truly antialias (preventing moiré).
Kodak cameras, according to the company itself, do not have a Hot-mirror filter, since infrared rays are completely blocked by their AA filter. In short, there is a lot of confusion in the terminology between AA, Low-Pass and Hot-mirror.
As an example of the independence of the AA and Hot-mirror filters from each other, you can, firstly, recall that some craftsmen remove the sandwich filter from their cameras in order to achieve maximum sharpness, that is, their goal is to remove the AA filter. After that, they have to specially order a Hot-mirror filter in order to avoid lowered contrast due to the influence of infrared light. Secondly, the anti-alias capabilities of the Canon 5D filter are less than that of the 350D, due to which, in principle, sharper images are possible, but the 5D is also more susceptible to moiré. At the same time, the 5D's infrared sensitivity is about one stop lower than that of the 350D.
4. Digital cameras for infrared photography
The classic method of checking a camera for IR suitability is with a remote control, for example, from a TV. With compact digital cameras that show the subject of the shooting directly on the screen, everything is simple: the remote control should be directed with a light bulb at the lens and press a button on it. On the screen of the camera, you will see how the lamp glows pinkish or blue.
Canon PowerShot S40, 1/25 sec.
With digital SLRs, the test is a little more complicated - the camera should be placed on a table or on a tripod, put the remote control in front of the lens and focus on the remote control. Set the shutter speed a little longer - for a few seconds, open the aperture wider and turn off autofocus. Now turn off the lights in the room and take a shot. If there is no light spot from the light bulb in the photo, then you can try increasing the shutter speed several times. If the frame is still black, then it is possible that the batteries in the remote control need to be changed. If neither the first nor the second will help, please write to me, because for now I am confident that all DSLRs are sensitive to IR waves, but, of course, I have not tested all of them.
Canon 350D, ISO100. Left - EF 50 / 1.8, right - EF 50 / 1.4. Both lenses are f2, 1 second. The reason for the difference between test results is described in section 6.
Canon DSLR cameras are equipped with a very effective Hot-mirror filter, so owners of these cameras must be prepared for very long exposures, the same applies to owners of Nikon D200, whose anti-IR filter is much stronger than the D70 or D50 filters. Under shooting conditions that require only 1 second exposure on the Nikon D70, the D200 or Canon 20D will require a shutter speed of 30 seconds. Owners of Olympus DSLRs will also have to shoot at long shutter speeds - with IR shooting on the E-500, the exposure increases by 11 stops compared to visible light, while for the C-2000Z this difference is 7 stops, that is, it has a shutter speed of 16 times less.
A table listing some of the compact cameras and approximate exposure increases for IR light can be found at jr-worldwi.de.
Examples of infrared photographs taken with various cameras, as well as noise levels in color channels and at various sensitivities, can be found at dimagemaker.com.
Cameras that accurately capture IR photographs:
- Canon IXUS 430, 500, 700, V2, Powershot A70, A75, A80, A95, G1, G2, G3, G5, G6, 10D, 1D Mark II, 5D, 20D, 30D, 300D, 350D, 400D, 500D, D30, D60
- Fuji S3 Pro UVIR, Fuji S5600, Fuji S9500
- Minolta Dimage 7
- Kodak P880
- Nikon Coolpix 950, 990, 4500, 5400, 5700, 8400, 8800, D100, D200, D50, D70
- Olympus C-220, C-720, C-2000Z, C-3030, C-4000, C-4040, C-5060, C-7070, C-70, C-750, C-770, C-765, C8080, E-10, E-20p, E-330, E-500
- Panasonic FZ30
- Pentax K100D
- Samsung Pro815
- Sony DSC F828, F504V, F707, F717, A100, H1, H5, P52, R1, S75, S85, V1, V3, W1
The source for the next photo, taken not only in cloudy weather, but also in the shade, took 40 minutes.
5.4. White balance
Photos taken with filters that allow some of the visible red light to pass through, like the Hoya R72, tend to appear uniformly tinted red, depending on the camera, scarlet or magenta. In fact, tonality is not the same on all subjects, so changing the white balance can make the photo colored. On digital compacts, for this, you must first set the white balance over grass or leaves through a filter. Shoot in RAW if possible. This will allow, firstly, to correct exposure errors, which are inevitable when determining the shutter speed by eye, and secondly, to set the white balance in the RAW converter.
The top left photo was converted from RAW without changing the white balance. In the top right photo, the white balance was set over the foliage. The bottom two photos were obtained from the corresponding top ones by changing the channels, which is described in section 7.1.
The effect of changing the white balance depends on the lens used and of course on the color of the subject that is selected as "neutral". White balance for leaves or grass is slightly different from white balance for needles.
A list of lenses for Canon cameras with an indication of suitability for infrared photography is given at the end of the article. Among the unsuitable lenses are also mentioned that are suitable only at a fully open aperture or only at the maximum focal length.
06:43 am - Infrared photographyWhat is infrared photography?
It is not yet warm, but it is no longer light.How to get an infrared image with a conventional camera. How to make an IR cut filter from scrap materials. Specialized cameras. Shooting difficulties and how to get around them. Choice of lenses, cameras and filters.
Interesting subjects in the infrared range.
Let's try to process them together using live examples of infrared images. We get ready-made solutions on image processing and together we will analyze how these solutions work.
THEORETICAL PART
Understanding infrared, visible and ultraviolet radiation. Difference between infrared and thermal radiation.
Infrared radiation was discovered in 1800 by the English scientist W. Herschel, who discovered that in the spectrum of the Sun, obtained with the help of a prism, beyond the red light boundary (i.e., in the invisible part of the spectrum), the temperature of the thermometer rises. At the same time it was proved that this radiation obeys the laws of optics and, therefore, has the same nature as visible light.
Fig. 1 Decomposition into a spectrum of solar radiation
On the opposite side, behind the violet band of the spectrum, there is ultraviolet radiation. It is also invisible, but it also warms up the thermometer a little.
Far infrared radiation (the longest wavelength) is used in medicine in physiotherapy. It penetrates the skin and heats internal organs without burning the skin.
The mid-infrared radiation is recorded by thermal imagers. The most popular applications for thermal imagers are heat leak detection and non-contact temperature monitoring.
Rice. 2. Thermal imager (mid-infrared)
We are most interested in the near (shortest-wave) infrared radiation. This is no longer the thermal radiation of the surrounding objects at room temperature, but not yet visible light.
In this frequency range, objects heated to a noticeable red glow emit quite strongly. For example, a nail heated red-hot on a gas stove flame in infrared light is bright white (Fig. 3) The colder areas (reddening of which is imperceptible in the visible spectrum) remain dark in the IR.
Rice. 3 Near IR
It is this radiation range that "works" when objects are heated in the sun or under incandescent lamps. And the same radiation is absorbed by "thermal" car windows and home energy-saving double-glazed windows.
Its most popular application is remotes. remote control(Fig. 4), infrared surveillance cameras with infrared illuminators.
At one time, data transmission using the IrDA standard was popular. The same infrared port in phones and laptops.
Rice. 4. Remote control
In digital, as well as film photography, the sensitivity of the camera to infrared radiation is undesirable. It leads to color distortion - black velor jackets look blue, the saturation of red is selectively lost.
Therefore, in modern chambers, they are fighting it in every possible way with a wide variety of methods. However, there is still residual sensitivity, albeit quite small.
Differences between black and white and infrared images.
Filters that make color photography look like infrared are quite popular on the Internet. However, they cannot work correctly, because the color picture does not contain information about the reflectivity of materials in the infrared spectrum. Roughly speaking, they cannot distinguish between a green car and green foliage and make all green objects in the frame white. Likewise, everything blue becomes black.In the same way, infrared photography cannot be obtained behind a simple red filter, no matter whether film or digital.
How to get an infrared image
In order to obtain a real infrared image, it is necessary, in the simplest case, not to let visible radiation into the lens so that the residual sensitivity of the camera to infrared radiation forms an image.Infrared films
In the case of film photography, this is ensured by the use of special films Kodak High Speed Infrared HIE, Konica Infrared 750 and the most popular - Ilford SFX 200. However, the film is not enough, you still need to install a filter that cuts out visible light. Otherwise, the film turns into an ordinary black-and-white panchromatic film with increased grain. A completely uninteresting combination.Infrared film is very demanding on storage conditions - it is highly recommended to store it in the refrigerator. It is necessary to load the film into the camera in complete darkness, because the tail of the film works as a light guide and illuminates up to half of the film. Plus, the frame counters in film cameras also light up the film. In no case should you expose the film when scanning baggage at the airport, and it is almost impossible to do this in modern security measures - the security service rears up and insists on showing what is in the box.
After exposure, the film should be developed using the classic black-and-white process in pitch darkness and preferably in a metal tank.
In total, film infrared photography is more heroic than practical.
Digital cameras
V digital photography everything is much more interesting. Most popular digital cameras the matrix has a residual sensitivity to the infrared range sufficient to photograph in the sun with a shutter speed of several seconds.Rice. 5. Infrared photography. Canon EOS 40D, F8, 30 ”. Slide film filter.
Despite the fact that the matrix of a digital camera is sensitive to infrared radiation, their sensitivity to visible light is thousands of times higher, therefore, in order to take an IR photograph, it is necessary to block the visible light with a special filter.
For example, Canon EOS 40D and 300D cameras in the summer sun required a shutter speed of 10 ... 15 seconds at F5.6 aperture and ISO 100. filter in the chamber).
If you are not afraid of long exposures, then it is quite possible to work in this mode - just install an infrared filter in front of the lens and take pictures with a tripod.
The disadvantage of this solution is not only in long exposures, but also in the impossibility of framing the picture - nothing is visible in the optical viewfinder. You always have to use LiveView, and not all cameras have it.
Cameras with retractable infrared filter (NightVision)
At one time, when digital SLR cameras had not yet gained popularity today, the Sony DSC-F707 / 717/828 cameras enjoyed the prestige among photographers.Fig6. Sony DSC-F717 / 828/707 Cameras
Their feature was the shooting mode Night shot- in it, a filter that absorbs infrared radiation was removed from the camera matrix. This made it possible to install a special filter in front of the lens that allows only infrared radiation to pass through and obtain an honest infrared image with relatively short exposures. Albeit with a lot of limitations of automation, but this made it possible to photograph portraits in the infrared range.
There is a legend that cameras designed for astrophotography, Canon EOS 20Da and Canon EOS 60Da are adapted for infrared photography, but this is not the case. They have a different Low-Pass filter and increased sensitivity in the red range. However, they are also insensitive to the infrared range.
Modification of the camera for infrared photography.
If the capabilities of a conventional camera with a filter seem insufficient and you want to take infrared photos with short exposures, you can remove the Hot Mirror filter from the camera and get a camera with a fairly high sensitivity to the IR range. In ordinary visible light, the camera will stop working normally - the colors will be constantly distorted, and this can only be dealt with by installing the Hot Mirror filter already on the lens. Therefore, for shooting in the infrared range, an old camera is often used, which has already served its purpose and it is not so a pity to break it.And since the interference in the camera has already begun, then you can put the infrared filter directly in front of the matrix. The advantages of this solution are that the picture is again visible in the viewfinder, and there is no need to put an infrared filter in front of the lens. And since you don't need a filter, you can use lenses with different filter thread diameters.
At home, it is theoretically possible to change the filter in front of the matrix, but in practice it is more profitable to give the camera to a specialist for revision - the result will be much better, and the camera will not be broken. Again, a knowledgeable person will test the autofocus of the camera for infrared photography and make corrections if necessary.
Infrared filters
Infrared shooting almost always requires the use of an Infrared passing filter. Filters that do not allow visible light to pass through, but are transparent to infrared radiation.And in this matter, the simplest assistant is photographic film: the developed color film is transparent in the infrared range. This means that the exposed and developed negative or simply developed slide film will turn out to be black in the visible range, but transparent in the infrared.
By the way, it is the infrared transparency of the film that film scanners with automatic dust removal use. They take an additional image in the infrared range - the dust remains visible against the background of a transparent film. And this is a ready-made dust removal mask.
Fig. 7. Slide Film
And if so, then you can cut a circle of the required diameter from a suitable film and insert it between the protective filter and the lens. If the effect is not enough, you can put several layers of film. The picture will lose some contrast and sharpness, but the infrared component will become apparent.
Figure 7A Slide Film and IR Light
You can also search black CD-R disks. They were popular for recording music, but recently, with the decline in popularity of CDs, it has become difficult to find them. If you remove the cover from such a disc, you will get a black disc, transparent in the infrared range.
Fig. 8. Black CD.
There are many variations of off-the-shelf IR filters available. The most popular filter in Russia is Hoya R72. It blocks radiation shorter than 720 nanometers, which is just the edge of visible light. Slightly less popular is the Schneider B + W 093 filter - it also completely blocks visible radiation.
Filters Schneider B + W 092 and Cokin P007 do not completely block visible radiation, so the picture is only slightly tinted. Slide film shows an intermediate result, so it has to be stacked in several layers.
Lenses
One light filter is not enough for shooting - you need something else to form the image. The difficulty of infrared photography is that the lens will be used in an abnormal application. The wavelength of light is at least slightly, but longer than the visible one, which means that the refraction of light will be less (remember the prism in Fig. 1), which means that the scale of the picture will change. The lens will become slightly longer focal length. At the same time, a whole scattering of problems arises, which somewhere have a stronger effect, and somewhere weaker. Let's consider them in more detailFocusing
If the lens is aimed at infinity in visible light, then in the infrared range it will be aimed a little closer. Front focus appears. But there is also a good side to this error - it is stable and you just need to turn the focusing ring to a certain angle. It is for this that Soviet lenses (for example, Jupiter-37A, Jupiter-9, Helios 44M-8 and some others) have an additional red mark R... For correct focusing in IR, you must first focus in visible light, and then turn the focusing ring onto the mark R.With modern lenses, this mark is quite rare, and with zoom lenses, its position depends on the focal length. Therefore, conventional phase detection autofocus SLR cameras especially not worth trusting. You can work around the problem either by using Live View and aiming at the contrast or focusing manually by controlling the sharpness on the screen. If the camera does not have Live View, then you can simply aperture the lens harder and thereby hide the focusing error in the depth of field.
Fig.9 Infrared mark on the focusing scale.
On fixed focal length lenses, you can set this mark yourself by taking several shots and choosing the position with maximum sharpness. The position of this mark does not depend on the focusing distance and aperture, so it is enough just to draw it once and use this correction in the future.
Enlightenment quality
The AR coating on the lenses consists of several layers of thin films, at the border of which the light beam is reflected, interferes with the main beam and significantly reduces the reflection intensity. That is, each coating layer is designed for a specific wavelength. However, for infrared radiation, its antireflection layer may not exist. Therefore, some lenses begin to "catch hares", show rather strong flare and lose micro-sharpness. And some - work normally in the infrared range.Irregularity of the field, Hot-Spot
Another problem with infrared optics is reflections at the lens joints in the lens. With especially multi-lens lenses, they sometimes fold so badly that a bright spot of illumination - Hot-spot appears in the middle of the image obtained (Fig. 10). The effect is more pronounced at closed apertures and at short focal lengths. If you remember that the matrix often has a hot-miror filter that reflects infrared radiation back into the lens, the picture is completely bleak.Fig. 10 Hot-spot
It's a shame that this effect most often occurs with ultra-wide-angle zoom lenses. These are the lenses that produce the most interesting infrared images.
Glare
Most lenses are not designed for infrared photography. Therefore, blackening of the inner surfaces, anti-reflections, and the placement of the drives inside the lens can lead to severe reflections when direct sunlight enters the lens. You have to use deep hoods, shoot from the shadows or take several shots with different positions of the highlights and collect mosaic panoramas from them.Rice. 11 Glare
All of the above features largely depend on the type of lens and may vary slightly depending on the instance or camera. There are reviews on the web for various lenses, tables describing suitability and problems that arise with lenses. You can find them by searching for "lenses suitable for infrared photography". But this does not mean that pictures with other lenses will not work at all. They may require some additional attention - for example, covering them from the sun, or cropping them a little differently. But in my experience, there has not been a single lens that was not at all suitable.
The only case of complete inadequacy for infrared photography is cameras with a lens set at hyperfocal distance (cameras without autofocus). In their infrared range, the sharpness zone goes forward, and there is simply nothing to correct the focus with. But such cameras are practically not found in the form of separate cameras. They can only be found in the most inexpensive phones or as a front camera on tablets. I don’t think that shooting in the infrared range with the front camera of the tablet could make even the slightest sense.
Practical part
Infrared photography is good for its uniqueness, difference from ordinary photography. The fact that familiar objects begin to look different. Therefore, it makes sense to focus on stories that emphasize this difference.In the infrared range, it is possible to obtain a picture with a very high contrast. It is somewhat similar in contrast to a black-and-white photograph behind a rich red K-8X filter, but the picture is even more contrast. In general, infrared photography is good in landscapes. Both urban and natural landscapes. With an abundance of sky, foliage and space.
Fig. 12 Gradient in backlit sky
The sky is interesting. Clear skies appear black because they do not reflect infrared radiation. Cirrus clouds, in turn, reflect solar and scattered infrared radiation very well, therefore they look bright white against a black sky. But thunderclouds, as containing large raindrops and large volumes of water, already absorb IR. Therefore, thunderclouds look black. The picture turns out to be similar to the sky, shot through a dense red filter, but with much more contrast. At the same time, even the smallest clouds are visible in the infrared range, almost invisible in the visible range.
Fig. 13 Water and sky in IR
In our latitudes, there is practically no dry and cloudless sky. There is almost always a slight haze in the sky and therefore the sky becomes very bright when backlit. This interferes with shooting circular panoramas, but it looks quite natural in wide-angle shots, even with the sun in the frame, as shown in Figures 11 and 12.
If the sun is hidden, for example, behind the trees, as is done in Figure 12, then it turns out to get rid of two problems at once - from glare from direct sunlight, and from gradients in the sky.
The water surface looks very unusual in the infrared range (Figure 13). Water absorbs IR radiation better than visible radiation and looks much darker in the IR range than in the visible. However, the reflectivity is slightly better than in visible light. These factors together create the feeling of a dark mirror.
Tree foliage and grass are strongly transformed in the infrared range. They become very light, almost white. Which, however, is quite logical - the leaves in the sun should not heat up, and the largest amount of the Sun's energy enters the IR. Tree trunks and dried vegetation absorb IR radiation and appear significantly darker. This feature of infrared images is used in aerial photography for the needs Agriculture to highlight areas of dead vegetation.
Pictures with an abundance of foliage become like winter landscapes. Flowers in IR can be either light or dark.
Insects most often turn out to be very dark - since they cannot maintain their body temperature, it is beneficial for them to absorb the heat of the sun as well as possible.
Rice. 14 Flowers in IR
The urban landscape also harbors unexpected twists - the brightness of paint pigments in infrared light can be very different from the visible one, and dark windows of buildings turn out to be transparent (or mirrored ones - dark, as in photo 13). All this, combined with the contrasting sky and white foliage, makes the landscape unusual and therefore interesting.
With portraits in the IR, everything is not easy. Lips are equal in brightness to the skin of the face, eyebrows and eyelashes turn pale. The skin looks significantly lighter than in the visible range. Volume is lost. The eyes, on the other hand, look very dark against the background of lightened skin.
In people with fair skin, the blood vessels protrude (Fig. 15). Adds uncertainty and cosmetics - you never know in advance whether lipstick, eye shadow or foundation will turn out to be dark or light in the IR. Colored hair also becomes unpredictable, but most often it becomes dark. Unpainted hair lightens.
Inexpensive plastic sunglasses are more likely to become transparent and clothing changes brightness. All this makes the result unpredictable when shooting large portraits, however, shooting in growth, and even in combination with the landscape, can diversify the photo session. Due to the remoteness of the figures, the faces can be hidden, and the unusual contrast and tone transmission will remain.
If you have a portrait infrared photo session, then it is advisable to check all the tools used for adequacy before the makeup - it will be very sad if the powder that the makeup artist applies to the forehead and cheeks suddenly turns out to be deep black in the IR range. If it is possible to persuade the model not to paint before the IR photo session, then it is better to do so. It is easier to draw a cut-off drawing during processing than to try to correct all the errors that appeared in the IR. But if you are unlucky and the makeup in IR does not work, then you can limit yourself to general plans, and make the missing large portraits in visible light.
Rice. 15 Portrait in IR.
Fig. 16 Channel mixer
After that, the sky will turn not red, but blue, and the foliage will no longer be blue.
It remains to align the white balance, and Image -> Auto Color does a great job with it.
These two operations can be written in a separate Action and in the future you can simply call it, and not search for tools in the menu.
It remains to use curves and masks to bring the picture to perfection and, if necessary, convert the image to black and white mode in any way convenient for you.
Rice. 17 Result of replacing blue and red channels
Bibliography
Hayman R. Light Filters. - M .: Mir, 1988 .-- 216p.Soloviev S.M. Infrared photography. - M .: Art, 1957 .-- 90s.
Joe Farace Complete Guide to Digital Infrared Photography. - Lark Books, 2008 .-- 160c.
Cyrill Harnischmacher Digital Infrared Photography. - Rocky Nook, 2008 .-- 112s.
Deborah Sandidge Digital Infrared Photography (Photo Workshop). - Wiley, 2009 - 256c.
David D. Busch David Busch's Digital Infrared Pro Secrets - Course Technology PTR, 2007 - 288c.
I don’t know about you, but I’ve always wondered: what would the world look like if the RGB color channels in the human eye were sensitive to a different wavelength range? Digging through the bottom of the barrel, I found infrared flashlights (850 and 940nm), a set of IR filters (680-1050nm), a black and white digital camera (no filters at all), 3 lenses (4mm, 6mm and 50mm) designed for photography in IR light. Well, let's try to see.
On the topic of IR photography with the removal of the IR filter on Habré - this time we will have more possibilities... Also, photographs with other wavelengths in RGB channels (most often with IR capture) can be seen in posts from Mars and in general.
These are flashlights with IR diodes: 2 left at 850nm, right at 940nm. The eye sees a faint glow at 840nm, the right one only in complete darkness. For an IR camera, they are dazzling. The eye seems to retain microscopic sensitivity to near infrared + LED radiation is at a lower intensity and at shorter (= more visible) wavelengths. Naturally, you need to be careful with powerful IR LEDs - if you are lucky, you can imperceptibly burn the retina (as well as from IR lasers) - the only thing that saves you is that the eye cannot focus the radiation to a point.
Black and white 5 megapixel noname USB camera - on Aptina Mt9p031 sensor. I shook the Chinese for a long time about black and white cameras - and one seller finally found what I needed. There are no filters in the camera at all - you can see from 350nm to ~ 1050nm. 
Objectives: this one is at 4mm, there are also at 6 and 50mm. At 4 and 6mm - designed to work in the IR range - without this, for the IR range without refocusing, the images would be out of focus (an example will be below, with a conventional camera and IR radiation of 940nm). It turned out that the C mount (and CS with a 5mm flange distance) came from 16mm cameras from the beginning of the century. Lenses are still actively produced - but already for video surveillance systems, including by well-known companies like Tamron (the 4mm lens is just from them: 13FM04IR). 
Filters: I again found a set of IR filters from 680 to 1050nm from the Chinese. However, the IR transmission test gave unexpected results - it does not seem to be bandpass filters (as I imagined it), but rather different "density" colors - which changes the minimum wavelength of the transmitted light. Filters after 850nm turned out to be very dense and require long exposures. IR-Cut filter - on the contrary, allows only visible light to pass through, we will need it when shooting money.
Visible Light Filters: 
IR filters: red and green channels - in the light of a 940nm flashlight, blue - 850nm. IR-Cut filter - reflects IR radiation, that's why it has such a cheerful color. 
Let's start shooting
Daytime IR panorama: red channel - with a filter at 1050nm, green - 850nm, blue - 760nm. We see that trees reflect the very near infrared especially well. Colored clouds and colored spots on the ground are due to the movement of clouds between frames. Separate frames were combined (if there could be an accidental camera shift) and stitched into 1 color image in CCDStack2 - a program for processing astronomical photographs, where color images are often made from several frames with different filters.

Panorama at night: you can see the difference in color different sources light: "energy efficient" - blue, visible only in the very near infrared. Incandescent lamps are white, they shine in the entire range. 

Bookshelf: Nearly all common objects are virtually colorless in IR. Either black or white. Only some paints have a pronounced "blue" (shortwave IR - 760nm) shade. LCD screen of the game "Wait a minute!" - does not show anything in the IR range (although it works for reflection). 

Cellular telephone with an AMOLED screen: absolutely nothing is visible on it in the IR, as well as the blue indicator LED on the stand. In the background - nothing is visible on the LCD screen either. The blue paint on the metro ticket is transparent in IR - and the antenna for the RFID chip inside the ticket is visible. 

At 400 degrees, a soldering iron and a hairdryer are glowing quite brightly: 
Stars
It is known that the sky is blue due to Rayleigh scattering - accordingly, in the infrared range, it has a much lower brightness. Is it possible to see the stars in the evening or even during the day against the sky?Photo of the first star in the evening with an ordinary camera:
IR camera without filter:
Another example of the first star against the background of the city: 
Money
The first thing that comes to mind for authenticating money is UV radiation. However, banknotes have a lot of special elements that appear in the IR range, including those visible to the eye. About this on Habré already - now let's see for ourselves:1000 rubles with filters 760, 850 and 1050nm: only individual elements are printed with IR-absorbing ink: 
5000 rubles: 
5000 rubles without filters, but with lighting at different wavelengths:
red = 940nm, green - 850nm, blue - 625nm (= red light): 
However, infrared money tricks don't end there. The banknotes have anti-Stokes marks - when illuminated with IR light at 940nm, they glow in the visible range. Taking a photo with an ordinary camera - as we can see, the IR light passes a little through the built-in IR-Cut filter - but because the lens is not optimized for IR - the image is out of focus. Infrared light looks light purple because Bayer RGB filters are. 
Now, if we add an IR-Cut filter, we will see only glowing anti-Stokes markers. The element above "5000" glows the brightest, it is visible even with not bright room lighting and 4W 940nm diode / flashlight illumination. This element also contains a red phosphor - it glows for several seconds after irradiation with white light (or IR-> green from an anti-Stokes phosphor of the same mark).
The element slightly to the right of "5000" is a phosphor that glows green for some time after irradiation with white light (it does not require IR radiation). 


