How to choose polymer clay earrings. Polymer clay earrings. Hair jewelry made of polymer clay
Designer jewelry is always highly valued in the fashion world. Polymer clay allows you to make any decoration with your own hands, putting your warmth, energy and imagination into it. Polymer clay jewelry is very popular among the fair sex.
Polymer clay

Polymer clay is a plastic material that resembles plasticine, loved since childhood. When heated to certain temperatures, it hardens and becomes like plastic. You can make any jewelry from it: earrings, rings, necklaces, pendants, hairpins and much more.
Huge color palette allows you to choose any shade. Colors can be mixed to get new ones.

The material is considered non-toxic, therefore it is safe for health.
Imagination, accuracy and creativity will provide an excellent result and will delight the author with new products.

Polymer clay is produced by many manufacturers, in different qualities and in different price categories.
To begin with, you can choose soft types of clay, from which it will be easier for a beginner to sculpt.
You should not buy a whole package, at first it is better to buy a separate color and try to make simple elements out of it and bake. If the product has not cracked, has not changed color, then you can also purchase a set of this manufacturer.
Before sculpting, you need to hold the clay in your hands - it will heat up from the heat, and it will be easier to sculpt.
It is better to roll out the clay in thin layers so that the resulting product is neat and elegant.

You should carefully read the instructions on the packaging, which indicate the baking time and temperature regime. It must be strictly observed and in no case increased, otherwise the product will deteriorate.
In addition to clay and an oven, you will need various accessories and tools.
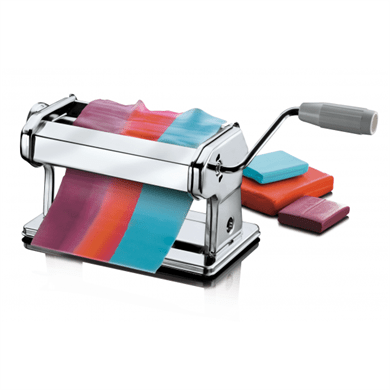
Instruments

- a machine for rolling out clay;
- extruder;

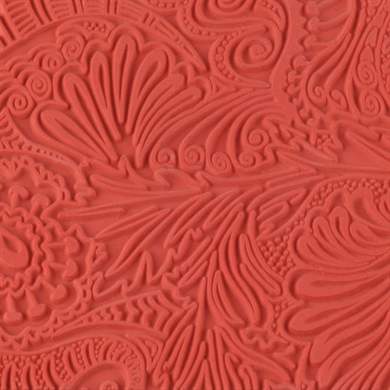
- texture sheets;
- glue;
- stationery knife;
- brushes of different sizes;
- wood stacks;
- sculpting surface;
- toothpicks.
Graceful roses

This master class will tell you how to sculpt flowers from polymer clay.
Roses look very beautiful and natural. They can be used to decorate earrings, bracelets, hairpins.
Materials:
- polymer clay of any shade - red, pink, white, yellow for a flower;
- stack with a ball;
- device for rolling clay.
- First, you need to create blanks for the flower petals.
To do this, you need to make as many small balls as the flower has petals. The sizes of the balls can be different, because a real flower has smaller petals inside than outside.
- Roll out the balls and cut into halves.
- Create the center of the flower: for this, make a drop from one ball with your fingers.
- Then gradually form the bud, alternately attaching the petals to the center.
The splendor and size of the rose will depend on their number.
- Bake, following the time and temperature indicated on the package.
In the video below, all the stages of this master class are discussed in detail:
Earrings

Taking the technique of making a rose as a basis, it is not difficult to make earrings.
Materials:
- polymer clay roses;
- rings for fastening;
- hooks.
Before sending the flowers to bake, you need to pierce a hole in the petal, into which you subsequently insert a ring and attach it to the hook, and enjoy beautiful new earrings, such as in the photo:

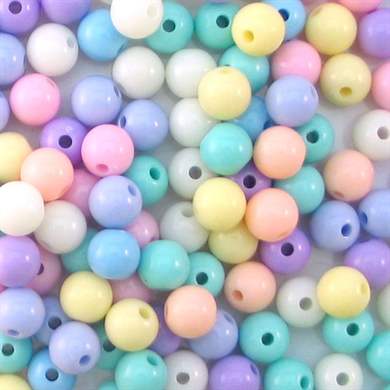
Beads
Handmade beads look amazing. They look very feminine and add originality to any look.

Materials:
- polymer clay of various pastel shades: beige, pearl, caramel, pink-brown, white.
- sequins;
- toothpicks;
- plastic varnish (matte and glossy);
- lace or chain.
- knead the clay;
- divide into pieces, based on the size of the beads;
- form beads of different sizes;
- use a toothpick to make holes in them;
- add sparkles to several beads, for this, dip your finger in the sparkles and press it against the surface of the bead;
- bake;
- let the beads cool completely;
- cover part of the beads with glossy varnish, and the other part with matte;
- collect beads.

You can make any piece of jewelry that complements your favorite dress, suit or blouse. It will be in harmony with the outfit, or vice versa, will become a bright accent in the image. DIY polymer clay jewelry is a pleasure to present as a gift. For an author's work, you need very little free time, creativity and imagination.

Video selection:
Polymer clay is a unique material from which you can make various beautiful and original things, for example, earrings. Due to the fact that this article will present a detailed master class, earrings can be made even by the most novice needlewomen, the main thing is not to be afraid to start.
How you can make polymer clay earrings
Jewelery, including earrings, is the most frequently made polymer clay product, as every fashionista can create unique jewelery that emphasizes individuality. It is easy to figure out how to make earrings from polymer clay: the video below will acquaint needlewomen with all the principles of work.
How to make flower earrings
Earrings flowers from polymer clay , the master class of production of which will be offered below turns out to be bright and refined. For work, you will need clay of several colors: pink, green and light green, accessories, as well as hooks, a knife, a rolling pin and a board, nippers, a brush, and foil. See photos of the work under the text.
MK includes certain stages. The process of making an earring must begin with determining the number of flowers that will make up the earring, and preparing the appropriate number of stamens. Then the stamens should be attached to the wire and a loop should be made at the end of each wire using round-nose pliers. Then you need to start making leaves, for this, narrow triangles should be cut out of a rolled clay layer no more than one millimeter thick in light green color. Then you need to attach these triangles to a wire around each stamen. In order to make petals, it is necessary to form balls from pink clay, then flatten them and form petals. To make the petals natural, they must be put on a sponge and pressed down in the center, you can use a dowel, and then apply red pastels on the bases of the petals. Then the petals must also be attached to a wire around each stamen and leaves.
Next, you need to prepare two pieces of wire about ten centimeters long, make loops at the ends of both segments and stick around these loops with pink clay. Then you need to attach three petals to the loops to form closed buds. Then you need to make green clay leaves and attach around the buds. After that, the flowers must be baked, it is best to place them in a ceramic bowl, after wrapping them with foil. For each branch, about five green clay leaves should be made. The stalks for the leaves can be a wire, at the end of which you need to make a loop and fix a leaf on it, then bake the required number of leaves. After all the elements are ready, you can start assembling the product. To do this, you need to prepare a tape tape and fix it on it, alternating first a leaf, then a flower. When the earring of the desired length is assembled, the excess wire can be cut off. At the final stage, it is necessary to attach connecting rings, ear wires and other decorative elements. How to make earrings - photos show each stage of the work.

Among the various materials for creating jewelry, many craftswomen especially note polymer clay. This material appeared in the life of needlewomen and began to be actively used by them for a long time, and since then the fashion for it has not passed. Modern craftswomen who want to make jewelry with their own hands turn to polymer clay, because it is plastic, bright, durable, and also inexpensive. In addition, clay jewelry making workshops are very simple and do not require any special skills. I was convinced of this personally - I fell in love with polymer clay and products made from it, after that. how she got her first earrings at an exhibition in Moscow, and wanted to make such jewelry herself.
Earrings are the most popular adornment for which polymer clay is often used. A huge number of interesting earrings can be made from the numerous bright colors of the material, and this will become just a godsend for fashionistas: you do not need to spend a lot of money on buying expensive jewelry, because you can always buy a set of polymer clay and make many wonderful gizmos out of it for less money. For example, Sonnet plastic is produced in Russia and is one of the most inexpensive. All that is required when sculpting polymer clay earrings is a little free time, a craving for creativity and a desire to please yourself by presenting a whole set of different earrings. Brush earrings look very beautiful, where the top is decorated with polymer clay flowers. Now it is fashionable to combine various materials - earrings can be made from a combination of polymer clay flowers and river pearls.


Spring flowers
How to make beautiful earrings - mk for beginners:
Flower earrings made of polymer clay are in great demand among needlewomen. They look great on any ear and add a touch of tenderness and elegance to the image. There are many types of clay flower earrings, and one of them will be discussed in detail in the master class below:

Lush flower
Continuing the theme of flowers, the next master class will show you how to make polymer clay earrings in the shape of a large lush flower. This option will be a little more difficult than the first, but if you put in enough effort, you can make absolutely any decoration.
- Sculpt a small cylinder out of white clay.
- Make a thin tortilla made from a purple piece of material and wrap it completely around the white shape.
- Using the blue and green colors separately, roll out the cake smaller, but the same thickness as the first. Wrap the cylinder in a semicircle.
- Crush your creation with an old credit card to make an elongated plump tape with a flattened image resembling a flower on a green background.
- Start to cut the resulting sausage so that it turns out semicircular petals.
- Use a special stack with a ball at the end and shape the piece into a petal shape.
- The next item in the master class is the assembly of the product. Connect in a circle all large petals first, a then put smaller petals on them, also collecting them in a circle. Note that both the first and second layers of petals should have a green center.
- Use a ball stack to deepen the core, and then lift the top petals. They should resemble a lotus in shape. Also lift some of the lower petals a little higher.
- Take the remaining piece of clay and sculpt it into a droplet shape.
- With the help of special nippers transform a droplet into a small bump and then place it in the middle of the earring.
- Do all of the above in the master class to mold a second earring of the same polymer clay.
- Place in the oven. Allow the food to cool down after baking..
- Take a metal stud used specifically for earrings and loop it to the center of the flower at the back.
- Sculpt leaves out of clay and press down a carnation with them, and send the decorations back to the oven.
- Bend the stud by attaching the hooks to it, after which the product can be put on the ears.
Original watermelon earrings
Such earrings will be especially relevant at the height of summer, the time of all kinds of fruits. Watermelons in the ears look interesting and very bright, and it is quite simple to make them, just follow an easy master class:

Flower earrings
This master class will look at a step-by-step diagram of how to make earrings with a flower pattern from polymer clay. Making them is extremely simple, so even a beginner can handle the decoration.
- Roll out a sheet of clay of any color and use a special round mold to cut out two circles.
- Get a special flower stencil. Place another small piece of clay and roll it out with a rolling pin to print. Then, using a familiar shape, cut out a circle with a floral pattern.
- Find special accessories in the creative store with which brooches are made. Place the patterned earthenware circle on top of it, giving it a curved look.
- Optional decorate flowers on future earrings with gouache or acrylic.
- The jewelry should be baked directly on the accessories to create brooches.
- Remove the earrings from the metal buttons and apply liquid clay to the back surface. Put the blanks for the earrings and cover them with the empty circles made in the first step of the master class.
- Slightly edit the dimensions of the back layer with a knife.
- Place the mesh on the back of the jewelry and gently press on it so that light characteristic patterns remain on the earrings.
- Place the earrings in the oven and cool after baking.
 It is very easy to make polymer clay earrings, just a little free time and the desire to do something creative are enough. The results are always interesting, so do not be afraid to fantasize and create something of your own.
After a long and cold winter, we want spring warmth, we want lightness and airiness in the image, tenderness and touchingness in the wardrobe, and here, by the way, we will be helped by small accessories that can complete and complement our image. Create accessories and you can do it yourself from various materials for needlework. In this master class, we want to introduce you to an amazing material - polymer clay and its unlimited possibilities, and we will sculpt delicate lilac flowers, which we will collect in voluminous bunches and arrange in hanging earrings.
Materials and tools required to create hanging earrings "Lilac inflorescences" from polymer clay:
- polymer clay pink, yellow and white;
- modeling stack;
- nail scissors or scalpel;
- a needle, toothpick or awl;
- pins with balls, a chain and two ear wires.

Let's start sculpting:
1. In order to achieve a smooth transition between flowers in the finished product, it is necessary to create an intermediate shade of plastic - light pink, by mixing polymer white and pink clay, taken in a 2: 1 ratio.

2.
We knead pink polymer clay in hands and after to the maximum state of elasticity, we form small droplets with a diameter of no more than 5 mm. With manicure scissors or a scalpel, cut a drop into four equal parts from the side of the wide part.

3.
Using a neat modeling stack, first move all the cut parts apart in different directions.

And after the blunt side of the stack, we press each of the four parts to the surface of the finger and roll it so that we get thin petals.

4.
To create a pair of earrings, you will need to create at least 15–20 such small flowers of different shades.

5.
Take pins with a ball and stick a small piece of yellow clay on a metal ball.

6.
Pass a pin with a yellow head in the center of each flower - this will heart of a flower.

7.
With the edge of a needle or toothpick, divide the core of the flower into four equal parts - just press the indentations in it.

8.
Towards the bottom, our future bunches will thin out, so form white droplets from white plastic, form droplets smaller than the pink droplets. In the same way, cut the droplet into four equal parts, but do not form petals, but simply pass a pin with a ball through the center of the bud.

And again connect the incised parts into a bud.

9.
When all the flowers and buds are formed, put them in the oven to bake. Bake according to the instructions for your brand of clay.

10.
After firing, you need collect earrings... Make loops from the rods extending from the back of the flower with round-nose pliers and fix them in the chain links. Remember that the top of the earrings is more voluminous than the bottom.

Hanging earrings "Lilac inflorescences" made of polymer clay.
We've got such wonderful, spring-like tender and touching earrings!

A chic jewelry for the ears for women made of polymer clay, which you can do yourself.
Believe me, with such a wonderful accessory, your image will be filled with romance, playfulness and tenderness!

Earrings made of polymer clay with lilac flowers!
Polymer clay earrings"Lilac inflorescences" - this is one of the options that can be molded from this plastic material. Polymer clay can be used to create delightful jewelry: earrings, bracelets, beads and necklaces, as well as key chains and flowers, for example, to decorate champagne bottles for a holiday.
We hope that our master class on making pendant earrings from polymer clay will be useful to you.
Polymer clay jewelry is gaining popularity every day. And this is not at all surprising, because you can make them yourself and all the necessary materials are on sale. And due to various types of coatings and color mixing techniques, you can easily imitate absolutely any materials and give the most complex and bizarre shapes. We offer the following ideas for polymer clay earrings.
Polymer clay for beginners - earrings
First, let's look at the simplest tutorial on creating polymer clay earrings. For work we need clay of red, green and beige colors. Also a knife and a machine for rolling clay into a plate.

Beautiful earrings made of polymer clay
Now let's consider a more painstaking mk for making earrings from polymer clay, which a beginner can also master. Among all the ideas for polymer clay earrings, this one is the most creative.

Polymer clay earrings - flowers
The flower theme is in great demand. But making buds will require certain skills. We offer a master class for making earrings from polymer clay, where the stamping method is used.
- Roll out the clay of the selected color on a typewriter.
- First, using a mold, we cut the blanks without texture.
- Next, cut off a small piece and put it on a special plastic sheet with a picture of flowers. Roll out a little and get a drawing. Next, using a mold, cut out a circle.
- Accessories for making brooches or buttons will help to give a slightly curved shape. These can be purchased from the art store.
- We put the blanks with the pattern and press down.
- If desired, you can apply a coat of paint or add color transitions.
- We will bake directly on metal buttons.
- Next, apply a layer of liquid clay.
- We put fasteners for earring fittings on it. We fix it from above with a blank without a pattern.
- The "wet" layer will protrude a little, so we cut it with a knife.
- We smooth the edges with our fingers and work on the surface with a mesh to remove fingerprints.
- We bake at the specified temperature.
- Next, just cover it with a layer of glitter and you're done.


With your own hands, you can make original earrings from


