Home photography studio. Home Photo Studio Free Moving Code Editor Windows
Home Photo Studio is a handy photo editor with over a hundred useful tools for correcting and enhancing images.


Among the useful tools there are both basic and completely unique functions that can make your work with the application as comfortable and productive as possible.
Do you want to process your photo in an original way? Use the built-in effects:
- Basic: brightness and contrast, white balance, blur effects, reflection and rotation, noise effects.
- Composite: mosaic, cubism style, combination, multi-photo.
- Stylization: vintage photography, engraving effect, uneven surface, pencil drawing, wood burning, book illustration, glowing outlines.
- Natural: moon and stars, snow, clouds, rain, fire and lightning.
- Color: coloration, hue, gradients, saturation, solarization.
- Illuminated: night and normal lighting, special and multi-colored lighting, spotlights and flashes.
- Geometric: fish eye, swirl, wave effect.
Fast photo correction.
Too dark or too light pictures, red eyes, lack of clarity - these and many other problems are familiar to people who use non-professional photography techniques. However, all the shortcomings can be easily corrected in the "Home Photo Studio".
Home Photo Studio can be downloaded for free in Russian in the assembly full version of the official links below to the site immediately after the description.
The software will help to correct the lighting, adjust the color balance of the photo, change its brightness, contrast, hue and saturation. In two clicks of the mouse, you will save your favorite photo from unnecessary noise, increase or decrease its sharpness and you can fix other conspicuous defects.
Photomontage accessible to everyone.
Home Photo Studio lets you make even more dramatic changes to your images. For example, it is easy to change the background of a photo in the program. A new background can be any color from the standard Windows palette, a gradient set by you personally, a texture, a picture from the built-in software catalogs or folders on your computer.
If desired, use the editing function and supplement the photo with new elements: clip art, original frames, other pictures.
Instant photo enhancement: a collection of effects.
Each tab contains over a dozen thematic effects. Images can be processed in whole or in part, it is enough to specify the appropriate parameters in the settings. You can also combine different effects with each other to create mind-blowing photo compositions.
Saving and other software features.
After processing, the image can be saved in JPG, PNG and other popular graphic formats. If you plan to post the picture in the future on your website or in the social network, then use the "Save for the Internet" function, then the software will help you create a file with optimal settings and you will quickly upload it to the resource you need.
The program has a function of batch processing of photos, as well as any photograph, after processing is completed, can be turned into an original postcard, calendar or collage and printed.
You can download Home Photo Studio for free and in Russian in full version from the official website using the links to the website below.

FL Studio is Image Line's popular sequencer (software for recording, composing and editing electronic sounds) with which you can create musical works.
Works of different musical genres can be created by mixing MIDI or audio material recorded in electronic memory using a variety of musical instruments (synthesizer, drum machine, mixer, etc.). Even FL Studio free download, the utility kit includes a huge number of sound effects, sample libraries, plug-ins necessary for composing musical compositions professional level... The created project can be exported to the popular WAV and MP3 format.
An important advantage of FL Studio is its affordability and ease of use, even for a novice musician, compared to professional sequencers such as LogicPro or Cubase. Ease of use is added by the fact that the program is completely Russified.
FL Studio does not overload system resources, can work as a VSTi, DXi or ReWire client (and as a ReWire host), has the ability to use various means and mastering effects. Supports ASIO and DirectSound sound cards. FL Studio uses complex algorithms for real-time playback and rendering, a built-in parametric equalizer and an advanced mixer that supports 68 tracks with the ability to apply 8 special effects each.
Features of the FL Studio program:
- a large number of built-in instruments and effects;
- fully customizable audio tracks and an extended playlist;
- support for a set of plugins and samples;
- export of projects to 16/32 bit mp3, ogg and wav files;
- support for MIDI format;
- the ability to apply effects and filters;
- automation support.
FL Studio is a simple and easy-to-use sequencer program for both beginners and professional musicians and composers. Allows you to create music, and not spend hours figuring out in an unfriendly interface shell. Available for download for free, has multilingual support.
153
Programs --- Visual Studio --- Editor code
So far, we've covered how to get started with Visual Studio 2013 and how to conveniently set up an integrated development system. Next, we will teach you how to effectively use some built-in commands, keyboard shortcuts, and auxiliary tool windows. It helps you write programs and design forms.
Developers spend significant time working on the texts of the programs. Therefore, it is very important to be able to correctly compose the code and navigate through its text. Visual Studio 2013 introduces a completely new code editor based on the Windows Presentation Foundation (WPF) rendering platform. It provides developers with many new features in addition to those inherited from previous versions of the system.
Code editor window layout
When you open the source file for editing, you are working with the code editor window shown in the figure below. The base of this window is the code window, which displays the program text:
There are two drop-down lists above the code window to help you navigate the code file. The first of these lists lists the classes contained in the code file, and the second lists the members of the class selected from the first list. The classes and their members are listed alphabetically. This makes it easier to find a method or class member definition in a file.
When you edit a program in the code editor window, lines of code that have been modified since the file was opened are marked in the left margin — yellow for unsaved changes and green for saved ones.

Regions of code
A class is considered to be designed correctly if it is designed for a single purpose and is not too complex or too long. However, in some situations, you will be forced to implement so many interfaces that your code file will become unwieldy. There are many possibilities that allow you to cope with this task, for example, split the code into fragments recorded in different files, or collapse its fragments using regions (regions), making it easier to navigate the program.
The use of partial classes (that is, classes whose definition is scattered across multiple files) allows the design process to write code into physically different files, which together represent a logically single class. The advantage of using separate files is that all related methods are efficiently grouped together, such as methods that implement an interface. At the same time, this strategy has a drawback: moving through the code requires constant switching between its files.
Alternatively you can use named code regions that allow you to collapse sections of code that are not currently being used. The figure below shows one region of code. If you click on the minus sign below the #region directive, then you can compress the region into one line, and if on the plus sign, then expand it again:

It is not necessary to expand the region to see the code that is written in it. Just move your mouse cursor over the region; and you will see the code in the pointer context window.
Collapsing code
In addition to the regions that need to be defined manually, Visual Studio 2013 includes outlines to automatically collapse methods, comments, and class definitions. Auto collapse mode is enabled by default. If it was disabled, then it can be re-enabled using the Edit -> Outlining -> Start Automatic Outlining command.
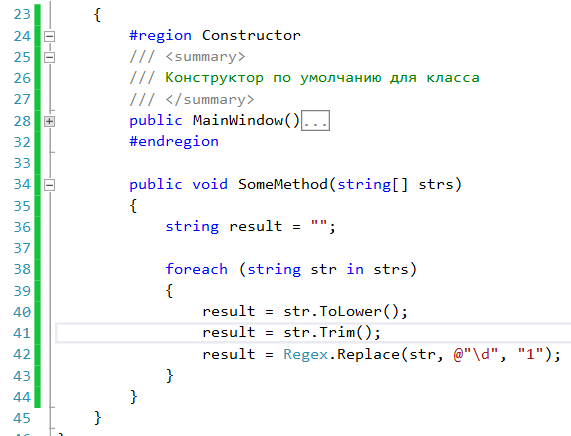
The figure below shows the four collapsible regions. One is called Constructor, and the other three automatic code structures allow you to collapse the class, XML comments, and the constructor method (which has been compressed). Automatic structures can be collapsed and expanded in the same way as regions that are defined manually.

The Edit -> Outlining menu contains a large number of commands that help to switch collapse modes, then compressing the entire file to the definitions of methods and properties (Edit -> Outlining -> Collapse to Definitions), then expanding all the collapsed code fragments again (Edit - > Outlining -> Stop Outlining). Another way to expand and collapse regions is based on using the keyboard shortcut
C # developers are familiar with the keyboard shortcut trick
Code formatting
By default, Visual Studio 2013 helps you write readable code by automatically aligning text. However, it can be configured to control appearance code. Common to all programming languages is the ability to control the events that should occur when a new line is created. The figure below shows the Tabs node under the Text Editors All Languages node of the Options dialog box. This node defines default values for all languages. These values can be changed using the Basic -> Tabs node (for VB.NET language), C # -> Tabs, or other nodes corresponding to other languages.

By default, the C # and VB.NET languages have smart alignment enabled, which, among other things, automatically aligns when you open and close attachments. Smart alignment is not available for all languages. In such situations, block alignment is used instead.
If you are working with a small screen, you may want to reduce tab stops and indent sizes to optimize screen usage. By making the tab stops and indentation sizes the same, you can easily tab-align your code. Interestingly, this dialog gives C # developers a lot of control over the layout of their code. There is only one checkbox in the VB Specific node Pretty listing (reformatting) of code which, when enabled, maintains a consistent look and feel of your code and frees the user from worrying about alignment methods, folds, class definitions, and namespaces. On the other hand, C # developers can control almost every aspect of code formatting with additional nodes.
Smart Indenting Mode Visual Studio almost always does a fine job of auto-aligning code as you type or paste it into the code editor, but sometimes you will encounter poorly formatted code snippets that are difficult to read. To have Visual Studio reformat the entire document and set the position of the curly braces and line indentation, choose Edit -> Advanced -> Format Document
To align an entire block of code at the same level without changing each line individually, select the block and press
You may have noticed that the Tabify / Untabify Selected Lines commands on the Edit -> Advanced menu are very different from the Format Selection command. These commands convert leading spaces to tabs and vice versa, rather than recalculating indents as the Format Selection command does.
Moving forward and backward through code
As you navigate through and between interface elements, Visual Studio 2013 tracks your position in much the same way a web browser tracks the sites you visit. Using the Navigate Forward and Navigate Backward commands from the View menu, you can easily navigate back and forth between the different elements of the project that you made changes to. To move back, use the keyboard shortcut
Additional properties of the code editor
The code editor in the Visual Studio system has a lot of features that are difficult to describe in an exhaustive way in this article. However, the most useful ones are listed below.
Highlighting links
Link highlighting is an interesting feature of Visual Studio that was introduced in 2010. The system highlights all occurrences of the name of a code element in scope (for example, the name of a method or property) that the cursor points to. This makes it easier to find places where this name is still used in the code. You can easily navigate between these places using the keyboard shortcut

Coarsening the code
With the combination
Collapsing text
To enable the option to fold text in the code editor window, select the Tools -> Options command, open the Text Editor node, select the All Languages subnode and set Word Wrap checkbox... You can also display the return arrow glyph where the text should be collapsed by setting Show Visual Glyphs for Word Wrap checkbox located below the Word Wrap checkbox.
To apply these settings to the current project, select the Edit -> Advanced -> Word Wrap command.
Line numbers
In order to keep track of the position of the cursor in a file, it is useful to number the lines in the code editor window. To enable line numbering mode, select the Tools -> Options menu command, open the Text Editor node, select the All Languages node and select the Numbers checkbox:
Split window
Sometimes you need to split the same code file in two and view it simultaneously in different windows. You can split the active editor window into top and bottom parts with splitter bar... These windows can be scrolled independently of each other and display the contents of the same file in them at the same time.

To split the code editor window, select Split command from the Window menu. Alternatively, you can drag the handle of the handle (located directly above the vertical scroll bar) to the position where you want the layout line to be.
To adjust the size of each window, simply move the break line up or down. Removing a split line is easy: double-click it or choose Remove Split from the Window menu.
Free movement of code editor windows
Visual Studio 2010 introduces an innovation that programmers working with multiple displays have long awaited - the ability to "free" code editor windows (and tool windows) and move them outside the main window of the Visual Studio system (as shown in the figure below) and even to another display. This allows you to work simultaneously with multiple code editor windows located on different displays. To free a window, first make sure it has focus and then select float command from the Window. Alternatively, you can right-click the title bar of a window and choose Float from the context menu, or click and drag the bookmark for that window (this will free the window) and drag it to where you want to position it.

When splitting the code editor window into two parts to view different fragments of the same file at the same time (see the previous section) is inconvenient, you can instead use a floating window, placing it, for example, on another display (if you are working with multiple displays) ... To do this, you can use a special trick (since double-clicking on the file in the Solution Explorer window simply activates the existing code editor window for this file) - select New Window command in the Window menu. This command will open the currently viewed file in a new window, which you can freeze and place anywhere.
Creating bookmark groups
If you don't have multiple monitors, you still have the option to open multiple code editor windows at the same time. To do this, create a group of bookmarks and create a mosaic from them in order to display at the same time. Each code editor window tab in this group appears as a separate tile. Thus, multiple bookmark groups can be created. Their number is limited only by the size of the screen on which they should be placed. Mosaic elements can be placed both vertically and horizontally, however, it is impossible to apply these two methods at the same time.
To start this process, open a few tabs in the code editor window. Make sure the code edit window tab has focus and then select command Window -> New Horizontal Tab Group or Window -> New Vertical Tab Group from the menu that opens. As a result, a new group of bookmarks and a mosaic for them will be created:

Alternatively, you can simply drag the bookmark down or behind an existing one and pin it at that position, getting the same result. You can also drag and drop bookmarks from one bookmark group to another using commands Window -> Move to Next Tab Group and Window -> Move to Previous Tab Group... These commands are also available from the menu that opens after right-clicking on a bookmark. To restore a user interface that has only one bookmark group, move the bookmarks from the new bookmark group (or groups) back to their original location and the mosaic disappears.
Multiple Solution Explorer Panels
If you are working on multiple monitors, then in versions of Visual Studio 2008 and below, you may have noticed that you cannot open multiple Solution Explorer panes. This limitation does not exist in Visual Studio 2013. Right-click one of the items in the Solution Explorer window and select the command New Solution Explorer view... Selecting this command will open a new Solution Explorer window containing the selected item. This is very useful when working on multiple monitors.

Additional features
In order to achieve really high productivity, it is useful to know about the many hidden features of the code editor that can save you a lot of time. Let's take a look at some of the more useful commands that are hidden in the code editor.
"Commenting out" and "uncommenting" a block of code
It is often necessary to "comment out" a block of code or "uncomment" it. At the same time, I would not like to add comment characters to the beginning of each line or remove them from there, especially if there are a lot of these lines in the block. Of course, in C # you can collapse a block of code by placing it between / * and * / to "comment out", but this type of comment is not available in Visual Basic. In addition, even in the C # language, problems arise when it is required to "comment out" a block that already contains such comments.
Visual Studio has a simple tool for "commenting out" and "uncommenting" blocks. To do this, select the block, then select command Edft -> Advanced -> Comment Selection to "comment out" it, or Edit -> Advanced -> Uncomment Selection to "uncomment" it. The easiest way to select these commands (which are likely to be the ones you will most often use) is with keyboard shortcuts. Press key combinations
Block selection
Block selection, which is also called by selecting a box selection, column selection, rectangle, or vertical text selection, as shown in the figure below, implies selection of a block of text, not of lines (a procedure called stream selection). To mark a text block, press the key

Multi-line editing
Multiline Editing is a new feature introduced in Visual Studio 2010 that expands the ability to select blocks. In previous versions of the system, after selecting a vertical text block, you could only delete, cut or copy the block. Now in Visual Studio, after selecting a vertical text block, you can type text on each line that will replace the selection. This is convenient, for example, when you need to change the access level to a group of variables from private to protected.

You can also paste text on multiple lines at the same time by creating a zero-width block and just start typing.
Circular clipboard
Visual Studio keeps track of the last twenty pieces of text that were copied or cut to the clipboard. To paste text that was previously copied to the clipboard, but was overwritten, instead of the usual combination
Full screen mode
You can maximize the view of the code to be edited by choosing View -> Full Screen command or by pressing the key combination
Go to definition
To quickly navigate to the definition of a class, method, or member below the cursor, right-click and select Go To Definition command or press the key
Find all links
In Visual Studio 2013, you can find the point of a method invocation or property reference by right-clicking on its definition and choosing Find All References command in the context menu or by placing the cursor on the method definition and pressing the keyboard shortcut
This property has been somewhat deprecated with the introduction of the new Call Hierarchy window, which will be discussed later. However, it still allows you to quickly find the method in use without navigating the Call Hierarchy window.


